Macadamia Banana Creme

I have nothing against cream. I love real dairy cream, but I rarely buy it. So when I feel like some, especially for ‘sweet’ occasions, I usually turn to yoghurt … of which I always have a plentiful supply.

Yoghurt however doesn’t always cut it. I love it, it’s SO good for my gut BUT… it’s tangy. That’s the only problem. Tangy works with fruit salad, even fruit flavoured cakes, but not chocolate.

I tend to think of avocado as ‘nature’s butter’ or ‘cream’ but its flavour isn’t easily disguised, and neither is its colour! Cacao (or cocoa) seems to be pretty much the only thing with the flavour and colour intensity to use with it. (See my Cacao Avocado Mousse recipe.) Nut creams (like my Vanilla Brazil nut Cream for instance) are easy as well but, like the avocado option, they also require added sweeteners, even if only a little.

Having played around with banana before (we all know you can make dairy free ice cream with it, and even grain free pancakes) particularly as a whole food sweetener, I struck upon the idea of combining it with finely milled nuts. Guess what? It works!

The only downside (which isn’t really an issue) is that it’s better made and eaten fresh, since the blending process causes oxidation that will turn the creme ‘brown’ (see pic below). Fresh is best anyway, right? (…for nutritional content.) Also, the thicker you make it, the more likely it is that it’ll be ‘grainy’ but if you’re pedantic about it being smooth, simply press through a sieve or squeeze through loose weave muslin cloth (or nut milk bag).

food fervour

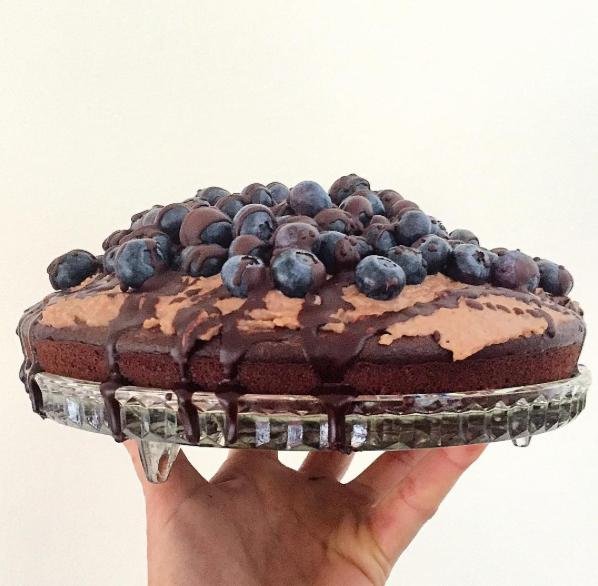
Oxidation causes changes and you can see the creme on this cake has ‘browned’. It didn’t affect the flavour at all 😉


All you need is a high powered blender, 100gms of macadamia nuts, 1 banana (the riper, the sweeter) and your milk of choice to alter the thickness of the creme… (I used 1-2 teaspoons (5gm) to make the spreadable creme for the cake above).

Firstly, mill the nuts (Thermies: 10 seconds at Speed 7-8). You may want to scrape down and repeat.

Scrape down before adding the roughly chopped banana and milk. Again, blend again at Speed 7 for 10 seconds, scraping down and repeating if you wish (I did).

Voila, you’re done! It’s ready to go. I’d love to hear what you think and the creative ways you use it. 🙂


French Toast Sandwich aka Cheat’s Pancakes

I usually opt for pancakes for Sunday brunch but today I was feeling a tad lazy (hey, I’ve been up since 5am surfing, cleaning & gardening… I’m entitled!) so what to do if you feel like pancakes but you can’t be bothered to make the batter and cook them?

Grab two slices of bread and an egg. French toast is dead simple and much quicker and easier to create than pancakes. All I needed to add was some elements for extra flavour, nutrient density and excitement…

So this is how it came together:

Since I keep my (variety of) breads in the freezer (pre-sliced) I had to pop two pieces in the toaster to thaw for a few seconds, so in the meantime, I set the frying pan on the stove on a medium-low temp, adding a splash of coconut oil. Setting the bread slices aside I then created the French toast batter by whisking together an egg, a dash of milk, a teaspoon of vanilla paste and a decent sprinkling of cinnamon in a cup.

Placing the two bread slices in the pan, I carefully poured about half of the egg mixture (that’s a quarter for each slice of bread) as evenly within the bounds of the crust of both pieces as possible, and after about a minute, turned them over with an egg slide to cook. Note: this method is actually a tad more difficult than your typical French toast procedure: normally you’d empty the egg mix into a shallow dish and soak the bread pieces before putting them in the frypan. My fiddly method keeps your crusts ‘crunchier’…

Next I grabbed a handful of hazelnuts, a dash of maple syrup, some more (rice) milk and cacao powder to make my hazelnut choc sandwich filling. Some minutes in the Magic Bullet – stopping regularly to check consistency and scrape down the sides – and that was done. Ready.

Returning to the pan, I divided the remaining egg mixture carefully again over the (other sides) of the bread slices, spreading the dregs of the mix (chunks of vanilla bean at the bottom of the cup) over the toast as well (waste not want not and …extra fibre!) before turning them for the last time.

While the second side cooked I grabbed my plate, then the tub of greek yogurt  and some fresh blueberries from the fridge…. ready to rumble! Once the toast was browned enough on the second side, I popped it on the plate, smearing a nice thick layer of the hazelnut choc mix onto one piece before topping it with the other slice. Dropping a couple of large dollops of yoghurt on top of the ‘sandwich’, I scooped the rest of the hazelnut spread on top and swirled them together with the end of the fork. Then it was simply time to pile on the blueberries, and get stuck in! Mmm, craving satisfied.Food Fervour

It was so rich that I know I won’t be able to eat again for many hours. To be honest, I think coconut cream (even though it may melt due to the meal’s warmth) may taste better than the yoghurt: while it’s good for some tartness (and probiotic qualities!) it’s somehow not quite complementary. If you decide to give this creation a go, let me know what you used and how it turned out 🙂


Vanilla Brazil Nut Cream

Mmmm, this stuff goood! I’ve only discovered nut creams recently (thanks to a fellow food blogger’s amazing creations) and they are ridiculously easy to make…why did it take me so long?!

This particular version is the one I used in the Cinnamon Buckwheat Pancakes I  suggested might make a great Mother’s Day breakfast treat. I’ve made a few varieties in the past, and the simplest way to enjoy them is with fresh fruit. I’ve used them as ‘dips’ at parties and smeared them on fruit for afternoon tea (see pic). food fervourWhat I haven’t yet tried is a savoury version (well, I AM a sweet tooth!)… apparently cashew nut cream is the best: I’ve seen it used to replace sour cream in mexican meals, for example.

Brazil nuts are another ‘cumbersome’ nut in that they don’t taste great and some people even object to their size (!) but again, they are extremely nutritious – right up there with the almonds and walnuts – so I usually opt for them for that reason.

My basic ratio for nut creams is 2:1, nuts to water. The amount of water simply varies the thickness of the cream. If you want ‘whipped’ cream – or a ‘spread’ –  use a little less water. Simple!Food Fervour

For this Vanilla Brazil Nut Cream I used:

1½ cups Brazil nuts (approx 220gms), ¾ cup water, 1 tspn natural vanilla essence, 6 drops stevia liquid

Pulverise the nuts in your blender (approx 20 seconds, Speed 7 for Thermies) to create meal, then add the remainder of ingredients and blend & scrape as many times as you feel you need to, to create the consistency you desire. I don’t mind my cream a little ‘grainy’ so I didn’t spend a heap of time on that.

Pop it in the fridge as soon as possible to prevent (slow down the process of) nut fat rancidity, unless you are ready to spread it on your pancakes!

NB: I have yet to make my own vanilla paste so I can ditch the processed sugar- & preservative- laden essence product AND I’ve read something recently about stevia NOT being as great a sugar substitute as we all thought (if I can find the article again I’ll post a link to it) so eventually (on my journey to ‘Re-sensitise my Taste Buds’) I’d like to drop all added sweeteners…