Super Simple Berry Crumble

I can’t deny my sweet tooth. So I try to work with it, by creating as much as possible without adding processed sweeteners. And by that, I mean even the least processed sweeteners that would be considered ‘better choices’ …like pure maple syrup and raw honey, for example.

food fervourSince it’s berry season here again (and damn, if berries aren’t some of the best fruits you can eat, not just for their lower natural sugar content but also for their prolific nutrient value) but also still technically Winter, I have been playing around with Crumble recipes for a healthier, warm dessert option (but believe me, they are certainly highly edible straight from the fridge and cold the day after) and I’ve arrived at the ideal result …for me.

You see, it definitely won’t be as sweet as many of you would expect or desire …so you may want to add sweetener yourself. If so, I’d leave the berries/berry element alone and add something (rapadura or maple syrup) to the crumble mix, if you have to. The other alternative is to serve the dish up with my Macadamia Banana Creme coz it’s naturally sweeeeet!food fervour

You will need a food processor, powerful blender or …a Thermomix (!) and the following ingredients: 150gm blueberries, 100gm roughly chopped strawberries, 1 teaspoon vanilla essence, 30gm almonds, 60gm oats, 10gm shredded coconut, 50gm coconut/macadamia oil, 1 teaspoon vanilla paste

Preheat the oven to 180°C and grease the base of a small casserole dish (I used a 16x16cm square container) with a little coconut/macadamia oil.

Add 50gm blueberries, 30gm strawberries and vanilla essence to your blending appliance and pulverise these into a sauce. (Thermomixers blend for 10 seconds at Speed 5-6.) Place the remainder of the berries into the casserole dish and thoroughly mix the fresh berry sauce through.

Without rinsing out your processing appliance, throw in the almonds, oats, coconut, coconut oil and vanilla paste (as well as any additional sweetener you may wish to add) and blend briefly: 3 or 4 pulses in a blender or food processor or the Turbo function in a Thermomix. The oil and vanilla paste moisture may make the crumble sticky, but it should be pretty easy to break it apart to spread it evenly over the berry mix.food fervour

Pop it in the oven for 30 minutes, decide what you want to add to it – cream, custard (see left), ice-cream, Macadamia Banana Creme –  and be ready to devour it as soon as it’s done. 😛


My Anzac Biccie Swap-Outs

I really don’t need to post this recipe. I mean, ANZAC biscuit recipes are a dime a dozen, at least in Australia! But I thought I’d share it to demonstrate how easy they are to make even if you don’t have all the ‘original’ ingredients.Food Fervour

Because I avoid mass-produced, over-processed foodstuffs, I don’t own some of the ingredients a standard Anzac biscuit recipe would ask for. It’s actually very easy to adapt most recipes; it only requires a little thought to be ‘creative’.

Here’s my ‘edited’ ingredient list and the swap-outs I use… that work perfectly well!

125gm butter (I’ve successfully used 100gm coconut oil before too)

2 tbsp golden syrup 2 tbsp organic maple syrup

1 cup plain flour 1 cup wholemeal spelt flour (I’ve also used ¾ cup rice flour & ¼ cup almond meal for a low gluten/higher protein option)

1 cup oats

1 cup dessicated coconut

½ cup sugar ½ cup organic rapadura sugar (for those who despise fructose & don’t mind over-processed products, the same quantity of dextrose will work)

2 tbsp water

1/2 tsp bicarbonate of soda

And this is how simple they are to put together:

  1. Preheat the oven to 175ºC and line a couple of trays with baking paper
  2. Place the butter/oil and maple syrup in a small saucepan over a low heat
  3. In a large bowl, mix together the flour, oats, coconut and sugar
  4. Add the water & bicarb soda to the saucepan when the butter has melted, mix it up then add to the dry ingredients. Mix well.
  5. Form balls of mixture and place them on the baking trays, spaced well apart. Flatten them out …with a spatula, some other food utensil or even just clean fingers, then…
  6. Bake for 15 minutes or until golden. Cool on wire racks.
    Should makes about 20 biscuits, depending upon how big you choose to make them!  😉

    Food Fervour

    I garnished this batch with a good ol’ Aussie macadamia nut.


Crustless Pumpkin Pie

Okay so Pumpkin Pie isn’t really a ‘Thing’ in Australia. But when you’ve bought a butternut at the farmers markets that’s the size of a human baby, finding ways to use it all becomes a challenge. Especially when you discover that the one kilogram you require for a hefty batch of Thai red curry pumpkin soup leaves you still with two thirds of said vegetable to demolish!

Food Fervour

yep, that’s my big butternut!

A friend once told me that pumpkin should only ever be roasted because “it brings out the flavour”. I discovered he’s dead right: the natural sugars caramelise and boost the veggie’s flavour incredibly. So I always roast it now, and often in quantities over and above anything I happen to be making at the time. That is to say, I roast extra so I’m prepared.

So, with a decent quantity of ready-roasted pumpkin chillin’ in the fridge, I ruminated upon its sweetness and wondered, “Could I successfully make a no added sugar dessert with it?” I considered how sweet the frittatas I made with it were. Could I make a kind of pumpkin ‘dessert’ frittata? That’s when I really began thinking about pumpkin pie… but I certainly didn’t want to have to make pastry for a pie crust. (Hell no! That’s way too much work!) Surely a blend of eggs, cream, some spices & that sweet roasted pumpkin could work?

A Google search for ‘crustless pumpkin pie recipes’ revealed (apart from all of the results being American websites) that their ingredients were pretty much as simple as I’d envisioned. Most of them however use (ugh!) evaporated milk, egg ‘replacer’ or ‘substitute’ and of course, added sugar. God Bless America!

Except for the cooking times (roasting the pumpkin & the final bake) this recipe is ridiculously simple and very time efficient. If you pre-cook the pumpkin as I did, you’ll save even more time. (Really, roasting excess vege is a great, healthy habit to get into; it helps you to stay ‘prepared’. You can save time and expand your meals options for salads, frittatas, risottos …but they also make a better choice of snack if you’re a regular ‘fridge visitor’ like me!)

Now, if you haven’t pre-roasted your pumpkin, the basic method is to preheat your oven to 200ºC, line a tray with baking paper then arrange skinned and roughly cut chunks of lightly oiled pumpkin (EVOO is fine even though you’ll be making a dessert… you won’t even notice the flavour after the roasting) and bake them for 20-30 minutes (depending upon the speed of your oven). Don’t burn them! If a skewer slides in easily & the centre feels soft, you’re done. It’s probably a good idea to let it cool a bit before moving onto the pie recipe.Food Fervour

Here’s what I used for my pie:

430gms of roast pumpkin, 2 eggs, 200gm pure cream, the following spices: 1 teaspoon vanilla paste, 1 teaspoon cinnamon, ½ teaspoon ground ginger, ½ teaspoon nutmeg, ¼ teaspoon ground cloves & a pinch of salt, plus 50gm pecans (optional). What’s also optional is to keep some maple syrup handy to add later if you don’t think the batter is sweet enough for you. (But don’t go overboard; the more you add, the runnier the mix will be…)

Preheat the oven to 180ºC and grease & line a baking dish/casserole dish or round cake tin with baking paper, then simply throw all of the ingredients into a food processor or high-powered blender and mix well. (Thermies: a couple of 10-20 second rounds on Speed 5-6, with some scrape-downs, should suffice.) Pour the ‘batter’ into your prepared receptacle and sprinkle with extra cinnamon, then cook for 40 minutes, or until a skewer comes out clean. Food FervourNB: Because I used a smaller (16x16cm) dish, my pie was thicker so I let it cook for almost an hour. Bear in mind that a thinner pie = potentially less cooking time.

Allow to cool a little before trying to remove from the dish. Slice and serve up with more cream …or just enjoy it undressed. 😛

My Sugar Reset

Last week I had a rough week. It was rough enough to affect my appetite… I didn’t eat much at all. Not that that’s a problem. Fasting is valid, after all. But it also gave my body a chance to ‘re-set’ (that’s part of the fasting science too, btw).

What happened is that I somehow grew some Willpower. Now, I know what’s good for me when it comes to food and I eat extremely well most of the time… I’ll hardly ever part with my hard earned cash for junk food. But in my hospitality job, I’ve found it much harder to stop myself. I’ve analysed the potential reasons and have come up with two: I hate waste, so throwing out the amounts of food we have to ‘by law’ (food hygiene regulations… which really stem from the litigious fears) bothers me enough to stuff a piece of something in my mouth as I tip an untouched foodstuff into the bin (like, I’m eating this for all the Starving out there who can’t). And then there’s the much more intangible, abstract and highly subjective reason: reaction to dissatisfaction & fatigue. That is, “I’m over today and I wanna go home so I’m going to eat this food I don’t need” because ….just because. There’s really no excuse. (I developed a personal theory that ‘Time at Work’ and Willpower are inversely proportional: that is to say, my Willpower decreases the further into a shift I get.)

But really, it all boils down to Self Control. And I have that in large doses in some ways, and not – it would seem – in others.

Food Fervour

veggie-dense salad

But when I lost my appetite last week, something clicked. I’ve no doubt it was borne of my negative state and my innate tendency to be “hard on myself” but I ordered myself to do that which I always want to, and try to do: cut added sweeteners from my diet. (Not that I have many anyway: only raw honey, organic maple syrup & rapadura sugar live in my house) I decided if I wanted anything sweet (and I am the biggest Sweet Tooth ever) I was only going to allow myself fruit (I am a fruit bat after all). That’s it. So the meals I ate for the couple of days were simple veggie-packed dishes – literally salads – anyway. (This was a crucial element to my ‘success’.)

I wasn’t sure how I’d go back at work. But fortunately, I was stationed on an espresso machine, so there was no direct temptation. On my lunch break however, I didn’t go anywhere near the refrigerated cabinet in the dining room: I simply pulled my homemade fare from the communal fridge and ate my healthy stuff. This was the third day since my ‘meltdown’. The next day was significantly more challenging, since I was stationed in a food outlet. Chocolate, cookies, chips staring at me all day. But….. NUH! My Willpower had well & truly kicked in. I was not going to have (added) sugars. And I have stuck to this. I knew, I know, if I make one slip, it will open the floodgates… and there’ll be no turning back.

Sugar really is addictive, science has proven this numerous times now. The Sugar v Cocaine experiment with rats is the most well-known: the rodents were allowed to self administer both sugar or cocaine from dispensers in their pens ….and they all opted for the sugar. That’s how powerful it is. (Link to PLOS source here.)

I recall one particular experience that really rammed this home to me: a friend had given me a block of Cadbury chocolate as a gift, even though I had some of my homemade raw dark chocolate in the fridge. Deciding to have “just one” row of the Cadbury, I returned to my desk. But within 3 or 4 minutes, I was back at the fridge & into the block again. This happened 3 more times. On my fourth visit to the fridge, I opted for a piece of MY chocolate (I usually make it with a very small amount of organic maple syrup)… and the craving instantly ceased. There were no more trips to the fridge.

Food Fervour

salted caramel choccies

The biggest surprise – which is not really a surprise at all – in this ‘Sugar Reset’ I’ve experienced, is the sudden and obvious aversion I now have to sugary foods. In just 3 to 4 days, I have re-sensitised my tastebuds to Sweetness. I’ve had this experience before, but each time it happens it blows you away at how intense the changes are. The first moment I noticed it this time around was when I made some ….chocolate.

I have a favourite recipe for Salted Caramel chocolate that’s sweetened only with dates (it’s a Thermomix recipe by Jo Whitton, the link to her blog Quirky Cooking is here) so I figured I’d allow myself to make some of that if I was permitting myself to eat whole fruits. But for a little variety, I also made some totally sugar free dark chocolate (literally just cacao powder & cacao butter) and created some chocolates that combined both of the flavours …like Cadbury’s ‘Top Deck’. The ‘shock’ came when I ate one of the plain Salted Caramel choccies, followed by a combined one. I preferred the latter. I preferred less sugar.

Food Fervour

a roasted pumpkin salad I found quite sweet

I noticed it in more subtle ways as well: I made vanilla custard minus the maple syrup I usually add on top of the sugar-laden vanilla paste, and it tasted just fine. I actually felt a little ill when I made roasted pumpkin soup because the sugars caramelised in that naturally sweet veggie during the cooking process, then intensified in the thick, creamy soup. I’m even eating less whole fruit. Now that’s saying something!

The truth is, to truly give up sugar, we really need to discipline ourselves and restrict ….just for a very short period of time. Your body needs the chance to de-sensitise (and you will notice the difference). Think of your body as a spoilt child… when is the right time to finally say No?


Monkey Bread Breakfast

While Sunday seems like the right day for decadence, I’m really not sure my breakfast this morning fits the bill. It’s so ridiculously dessert-like that I’m… I’m almost feeling… guilty.Food Fervour

You see, yesterday I decided to try a recipe for something I’ve never (to my knowledge) eaten before: Monkey Bread. I’d been preparing my spelt sourdough from Jo Whitton’s Quirky Cooking, when on a whim, I decided to keep on cooking …I had the time and the ingredients (kind of)… and I chose her to try her monkey bread.

As with many of my yeast-based bread attempts, it didn’t seem to turn out the way it should have …according to photos of other Monkey Breads I’ve seen. But then, I did make a couple of small adaptations: I halved the quantities (that shouldn’t’ve mattered) added cinnamon to the dough (this neither) and finally used maple syrup in the ‘butter sauce’ instead of solid sugar granules (like rapadura or coconut sugars). That most certainly could have had some effect on the outcome. But I tell you what, I don’t regret it because I had a bit left over, and it was an integral element of my wicked breakfast today.

Suffice to say, it still tasted good (and I only ever throw out totally inedible foodstuffs) so after it had cooled right down, I cut it into slices and shoved it in the freezer for future consumption. No surprise that it ended up on my mind this morning. At first I envisaged trying to make French toast with it but laziness kicked in, and I opted for super simplicity: toasting (in the griller). No frypan to wash up, you see. 😉

It came together with just the following ingredients: two slices of monkey bread (you could use banana bread or slices of some other sweet loaf) one banana, a ‘scattering’ (small handful) of macadamia nuts, 2-3 heaped tablespoons of Greek yoghurt and about a tablespoon of the leftover vanilla-butter-maple syrup sauce (you could of course substitute with straight maple syrup, but you definitely will not need a whole tablespoon; try 2 teaspoons) (FYI, the ‘black bits’ in the sauce in the picture above are fragments of vanilla bean from my homemade vanilla paste.)

Toast the bread in the grill, whilst slicing up the banana. Break the toasted bread into chunks in your bowl, scatter over the banana slices and macadamias then top with the yoghurt. Finally drizzle over your sauce/syrup. You could scatter some berries on top as well for a burst of freshness (this came to me after I’d emptied the contents of the bowl into my body, dammit!)

If you give this a go, please let me know what you think: breakfast or dessert? 😉

French Toast Sandwich aka Cheat’s Pancakes

I usually opt for pancakes for Sunday brunch but today I was feeling a tad lazy (hey, I’ve been up since 5am surfing, cleaning & gardening… I’m entitled!) so what to do if you feel like pancakes but you can’t be bothered to make the batter and cook them?

Grab two slices of bread and an egg. French toast is dead simple and much quicker and easier to create than pancakes. All I needed to add was some elements for extra flavour, nutrient density and excitement…

So this is how it came together:

Since I keep my (variety of) breads in the freezer (pre-sliced) I had to pop two pieces in the toaster to thaw for a few seconds, so in the meantime, I set the frying pan on the stove on a medium-low temp, adding a splash of coconut oil. Setting the bread slices aside I then created the French toast batter by whisking together an egg, a dash of milk, a teaspoon of vanilla paste and a decent sprinkling of cinnamon in a cup.

Placing the two bread slices in the pan, I carefully poured about half of the egg mixture (that’s a quarter for each slice of bread) as evenly within the bounds of the crust of both pieces as possible, and after about a minute, turned them over with an egg slide to cook. Note: this method is actually a tad more difficult than your typical French toast procedure: normally you’d empty the egg mix into a shallow dish and soak the bread pieces before putting them in the frypan. My fiddly method keeps your crusts ‘crunchier’…

Next I grabbed a handful of hazelnuts, a dash of maple syrup, some more (rice) milk and cacao powder to make my hazelnut choc sandwich filling. Some minutes in the Magic Bullet – stopping regularly to check consistency and scrape down the sides – and that was done. Ready.

Returning to the pan, I divided the remaining egg mixture carefully again over the (other sides) of the bread slices, spreading the dregs of the mix (chunks of vanilla bean at the bottom of the cup) over the toast as well (waste not want not and …extra fibre!) before turning them for the last time.

While the second side cooked I grabbed my plate, then the tub of greek yogurt  and some fresh blueberries from the fridge…. ready to rumble! Once the toast was browned enough on the second side, I popped it on the plate, smearing a nice thick layer of the hazelnut choc mix onto one piece before topping it with the other slice. Dropping a couple of large dollops of yoghurt on top of the ‘sandwich’, I scooped the rest of the hazelnut spread on top and swirled them together with the end of the fork. Then it was simply time to pile on the blueberries, and get stuck in! Mmm, craving satisfied.Food Fervour

It was so rich that I know I won’t be able to eat again for many hours. To be honest, I think coconut cream (even though it may melt due to the meal’s warmth) may taste better than the yoghurt: while it’s good for some tartness (and probiotic qualities!) it’s somehow not quite complementary. If you decide to give this creation a go, let me know what you used and how it turned out 🙂


Bulletproof Turmeric

You’re probably thinking “What the..?” But I didn’t know what else to call this amazing warm bevvy. It’s possibly an acquired taste, but given it is loaded to the hilt with health-giving properties, I’ve fallen in love with it…

Food FervourMost people know by now how good turmeric is for you. It’s classified as a “Superfood” (if there is such a thing) because its active ingredient, curcumin, is a powerful antioxidant and has highly effective anti-inflammatory properties. I’ve often wondered how to get more of it into my diet …without having to eat curries …daily. This drink is my answer.

I’ve seen many references to hot turmeric drink recipes, but most of them involve milk of some kind (which kind of stands to reason if they happen to be named ‘Golden Milk’). Now, whilst I don’t have an issue with milk per se, I definitely find heating water much quicker, easier & cleaner than heating milk. (And what the heck; there’s also the calorie argument if it really matters to you!)

So when I read the recipe for ‘Turmeric Tea’ on Russell James’ website the Raw Chef I was keen to try it, and then I realised its similarity to the Bulletproof coffee phenomenon: black coffee blended with ‘healthy’ fat is supposed to increase satiety, reduce caffeine reactions (like jitters) and improve mental clarity. But when I tried it, I just liked the way it made the coffee creamy. And this is pretty much what happens in this drink. But the oil also, more importantly, aids in the absorption of the star ingredient, as curcumin is fat soluble.

So vegans, lactose-intolerants and lazy people rejoice: this is a super-easy, delicious, caffeine-free health-giving concoction! Just a few words of warning, however: turmeric stains. I haven’t really had a huge issue with this (maybe I’m lucky) but be prepared for some yellowing of your equipment. Secondly, and more importantly, blending warm or hot liquids can be dangerous. Never use boiling water in an airtight blender: pressure build up can cause serious injury. Thermomixes are designed to handle this kind of use so they are the best option. Hand-held (stick) blenders obviously allow airflow, but I’m not sure how effective they will be for the entire process (the first step involves pulverising the turmeric). I have made the tea successfully in my Magic Bullet, but I ensured the water temperature was below 70º and opened the container slowly (there was still the hiss of a pressure release). Whatever you opt for, please take care.

Food FervourYou only need five ingredients for this brilliant beverage: water, turmeric, coconut oil, honey or maple and black pepper (apparently a substance in this called ‘piperine’ aids curcumin absorption by 2000% Reference: Authority Nutrition)

1 cup hot water (I used ½ cup boiling water + ½ room temp, but vary according to your blender option)

1 finger fresh turmeric, (approx 4-5cm long) peeled and roughly chopped (apparently ½ teaspoon of powdered turmeric is an acceptable substitute but I’d urge you to avoid processed foods where possible!)

1-2 teaspoons honey (or maple syrup for vegans)

1 tablespoon coconut oil (my aim is to try butter and even macadamia oil myself, in future. Let me know if you do and how it goes!)

a good pinch of black pepper

and perhaps ground cinnamon for dusting

Simply add the turmeric to the hot water and blend at high speed for approximately one minute. If you’re particular about ‘bits’ in the bottom of your cup, you could strain the fluid through a fine sieve (like a tea strainer or infuser) but I actually didn’t find there was much left …so save on your washing up and just consume the ‘wholefood’.

Add the honey, oil, pepper and wazz it up again for anywhere between 15-30 seconds. Pour into your teacup or mug immediately and watch the ‘froth’ form as you dust with cinnamon. Enjoy every golden sip.


Raw (aka Clean) Chocolate

I’ve never really been a choc-a-holic, but strangely that changed when I learnt that dark chocolate was considered to be somewhat healthy (in small amounts, of course). Oh, and when I realised how easy it is to make at home.

My initial love affair with Lindt 70% and 80% chocolate gave way to instant gratification in the comfort of my own home, as well as feeling uneasy about the other 20-30% of the Lindt ingredients (one of which I’m dismayed to discover is palm oil) 😦

food fervourRaw chocolate recipes weren’t as prolific a few years ago, but I found one on Lee Holmes’ site ‘Supercharged Food’ (link here) and was super surprised at how easy it seemed to be. Luckily a friend had presented me with a packet of organic cacao powder, so I could instantly ditch the more processed-therefore-less-clean cocoa powder in favour of extra nutritional benefit in my ‘treat’.

My very first attempt at raw chocolate comprised cacao powder, coconut oil and dextrose (back in the day, I was seriously anti-fructose… I’ve eased off that a bit now… opting for less processed ingredients over fructose content.) In fact it was scary how quickly you could make it: almost less time than it takes to get in the car and drive to the shop for the mass-produced, sugar- (and god knows what else-) laden crap. I was so bloody excited about how easy it was to make that I posted a recipe on my first (other) blog, A Life in WordsHere’s the direct link to that if you’d like to take a squizz…

I finally looked into the cacao butter Lee uses only a little of in her recipe: I’d previously thought it was just a body moisturiser. Well, it is the BOMB. Being cacao fat, it tastes like …chocolate. Not coconut, surprise-surprise! And unlike coconut oil, cacao butter won’t liquify at 20 degrees, so you won’t have to drink the chocolate from your hands in summer.

It is seriously as easy as this: one part cacao butter to one part cacao powder. Then add your choice of sweetener to taste. In fact, I have found that if making “fruit’n’nut” chocolate, I don’t need any sweetener at all thanks to the natural sugar (& fibre) content of the sultanas.

Let’s start with ½ cup of cacao butter and ½ cup cacao powder (so if anything goes wrong, you don’t end up wasting too much of these quite costly ingredients). I now prefer to use maple syrup for a sweetener, finding honey too viscous and coconut sugar takes too long to dissolve.

food fervourHow do you know you have half a cup of cacao butter when it comes in ‘chunks’? I kind of solve this in the choice of equipment I use for the first part of the recipe method: Place a small saucepan of hot water (only about 2-3cms deep) on the stove over the lowest heat possible. Place the cacao chunks in a (tempered) glass measuring jug (I use ‘Pyrex’ brand) and sit the jug in the saucepan. Wait for the butter to liquify.

Simply add the equivalent amount of cacao powder and your choice of sweetener, to taste, mixing well (I use a small spatula, to press out any lumps of cacao powder). If you want to add any flavours (spices like vanilla, or essential peppermint oil) you’d do that now as well. A lot of recipes ask you to whisk the ingredients… I’ve been too lazy to try that!

The final step for ‘plain’ chocolate is to decide how you’d like to set it. I sometimes use silicone ice cube tray moulds for individual chocolates or, if very lazy, I’ll lay baking paper down on a plate and just pour out the chocolate onto it so that it it will form one big block (that you can break into pieces once set). Once you’ve made your decision, pop the chocolate in the freezer for about half an hour, or the refrigerator if you don’t’ need it for a few hours….

food fervour

fruit’n’nut sticks and blueberry hearts

You can experiment to your heart’s content with this: here are some of my  favourite variations:

Blueberry Hearts: I pop some frozen organic blueberries into silicone heart moulds before pouring in the chocolate… same goes for whole Macadamias

Fruit’n’Nut: I put sultanas & peanuts in moulds before I add the chocolate mixture…

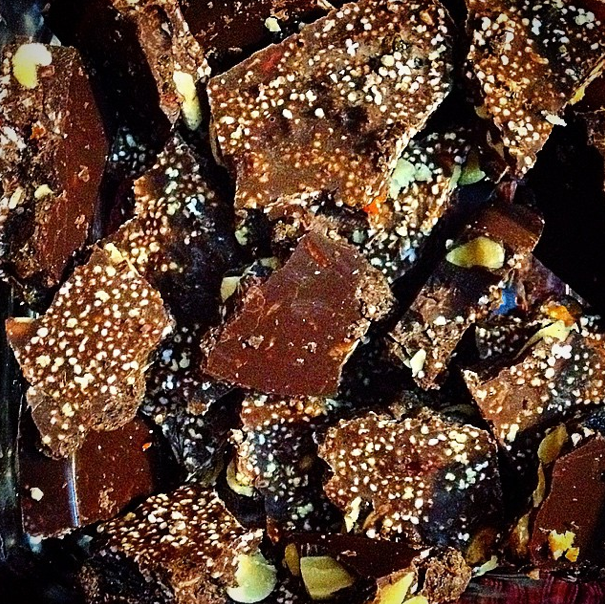
Chocolate Bark: I pour the chocolate onto baking paper on a plate, or into a dish ‘oiled’ with coconut oil then sprinkle anything and everything into it, like: chopped nuts, seeds, goji berries, shredded coconut, amaranth puffs… go nuts!

food fervour

Chocolate ‘Bark’

Milk Chocolate: I recently decided to try adding (organic) milk powder to a chocolate mix and I thought it was so good that I pretty much ate the whole test batch in one go! (This is not to say everyone will agree.) Add approximately half the amount of milk powder to the fresh chocolate mix (so ¼ cup or two tablespoons per the measures I provided above, and mix VERY well (it will thicken quickly) to dissolve the powder as well as possible, then set or add stuff as you wish.

Please feel free to share any amazing combinations you concoct!

food fervour

Strawberries dipped in raw chocolate
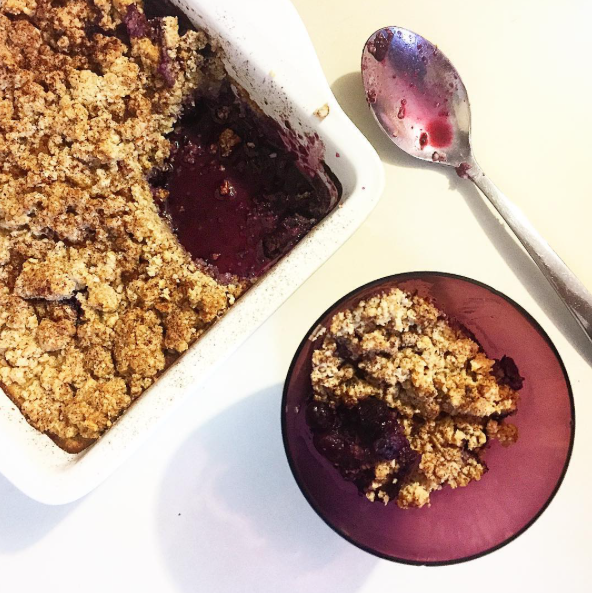
The Meaning of Lunch

I have no idea why the word ‘Lunch’ brings up a particular meal description for me. Just like certain smells and songs have the power to evoke memories, for some reason, the word ‘Lunch’ to me means: a ham sandwich and cold chocolate milk.

I have, of course, eaten a huge variety of foods for ‘the midday meal’ in my 44 years, but for some strange & unknown reason, the ham sandwich, the chocolate (actually, Akta-Vite) milk and the time & place I consumed these, seems to have somehow forged an attachment to this one word.food fervour

Mum used to make our lunches for the most part. She would of course try to make us take responsibility ourselves, but ….lazy kids… say no more! Sandwiches were often the quickest, easiest meal and in that day-and-age of limited nutritional education, it stood to reason that these were what we were mainly fed.

Living in the tropics as well meant food preservation was a bit of an issue, but Mum got around that one with the help of the freezer. Making the lunches at night to freeze was also a time-saver in the mornings. Pack and go.

So my ham sandwich (cut in half horizontally, not diagonally, because it fit better in the lunchbox as two rectangles rather than triangles) and my Akta-Vite thawed out in time for ‘Big Lunch’. (In Australia, morning recess and lunchtime are known as ‘Little Lunch’ and ‘Big Lunch’. It’s fairly easy to work out, yes?) We would often eat most of our packed foodstuffs at ‘Little Lunch’ as well, leaving the morning tea fruit or whatever for the midday break.

The particular memory or image I have of myself consuming this specific menu is in my junior years at high school (so would’ve been twelve or thirteen years old). Ours was a brand new state school and there were as yet few places to sit and eat comfortably.

A couple of us are sitting cross-legged on some concrete at the rear of one of the classroom blocks and I have my lunchbox in my lap, and I’ve already vigorously shaken the plastic drink bottle full of the still-partially-frozen Akta-vite, ready to drink. I bite into the soft white bread sandwich, enjoying the saltiness of the ham chewing and swallowing before taking a swig of the sweet cold choccy milk. Ahhhh. Why do they go together so well?

While I’d now consider this kind of meal a bit of a ‘fail’ in the nutrition stakes, every now and then I decide to treat myself to those ‘sensations’. Today was one of those days. But the end product was slightly different; slightly healthier thanks to my swap-outs.Food Fervour

Instead of mass-produced ham, I used a nitrite-free product. I replaced the white bread with a high fibre gluten-free version; my pure homemade butter in place of margarine (ugh!) and instead of the sugar-loaded (but ‘mineral-dense) Akta-Vite, I mixed cacao and a little maple syrup with my fresh, homemade rice & almond milk. Admittedly, I broke from tradition and added some melted tasty cheddar to the sanger today (see pic)…. who doesn’t love a ham ‘n’ cheese “toastie”?!

Craving satisfied, without the added stress on my internal organs. But I will want a heap of veggies for tea tonight! 😉

Raw Carrot Cake with Lime Cashew Icing

I’ve had this recipe earmarked to try for quite some time now… but it was only this week I found the (time &) motivation. Included in a handout from a raw food demonstration I attended years ago, I’d filed it away in a cooking folder, to sit idly waiting for me to visit it.

food fervourWell, this week, it was Time. And I was impressed with the result. As usual, I made a few alterations to the original recipe (including halving all the amounts) and I believe there is yet more room for improvement!

Apart from a powerful blender (I used my Thermomix and later, to fine tune the icing, the Magic Bullet) you will need:

1 cup brazil nuts, 5 medium carrots, ¼ cup dates, ¼ cup maple syrup (I actually used ‘date water’ which isn’t as sweet as the syrup so you may find you could reduce this amount) ½-1 teaspoon grated ginger, 1½ cups desiccated coconut, ¼ sultanas, 1½ tblspns psyllium husk

Mill the brazil nuts first (TM: 10secs, speed 9) and set aside, then grate the carrots (TM: 10-15secs, speed 5-6). Next, blend the dates, liquid sweetener & ginger (TM: up to 30secs, speed 7-9). Finally, add in the nut meal, carrots and remaining ingredients and mix well (TM: approx 1min, speed intermittent (knead) scraping down then mixing 30secs, reverse speed 4). Empty the mixture into into a greased (coconut oil) lined dish (the mixture perfectly filled a 15 x 20cm stoneware baking dish I have) pressing it in and smoothing it over. Refrigerate, or freeze if you prefer.

For the icing, mill ½ cup raw cashews (TM: 10 secs, speed 9) then add approximately 2-3 tablespoons of maple syrup (again, I used date water instead) the flesh & rind of half a lime and a dash of coconut oil. Blend well (TM: 30-60secs, up to speed 8. You will need to scrape down a few times. This is where I transferred the mixture to my Magic Bullet short cup for a smoother consistency). Simply spread over the top of the ‘cake’ and refrigerate (or freeze) until ready to devour!