Instant Lychee Ice Cream

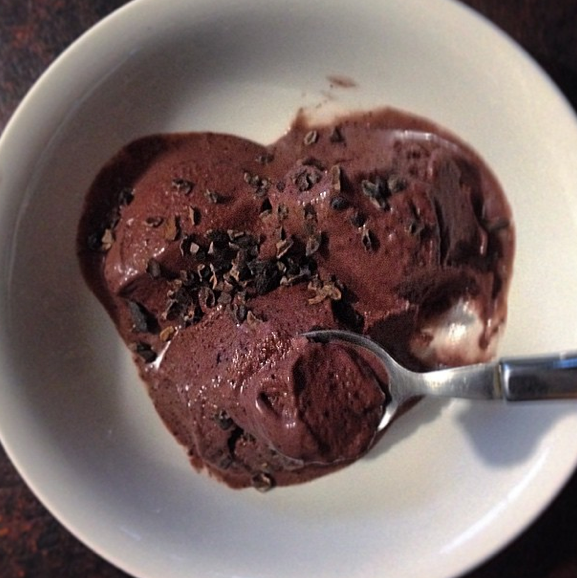
Ice cream is one of my weaknesses. But today I made some here at home, from scratch, and in less than 5 minutes …with two ingredients. Yes, just two, real, whole-food ingredients. No added sugar whatsoever.Food Fervour

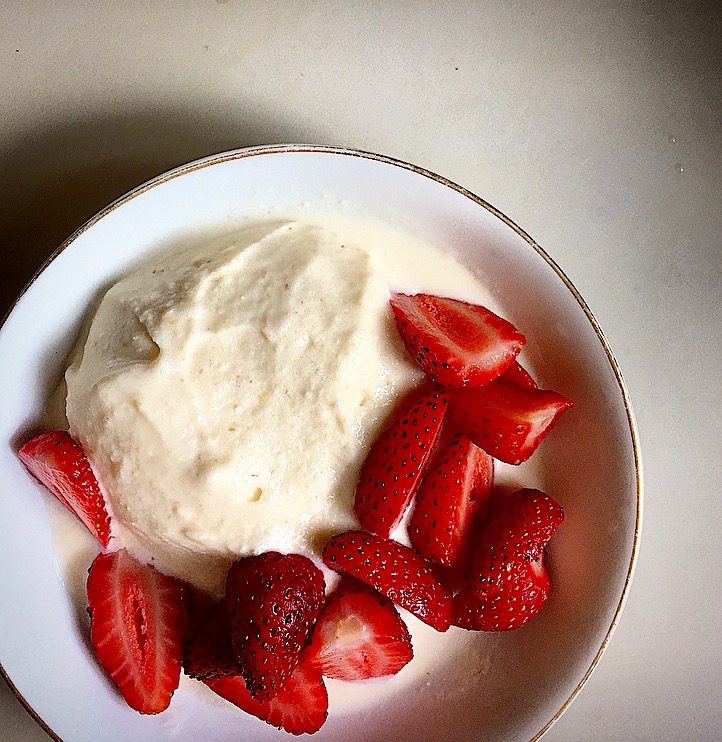
All you have to have prepared for instant ice cream is some frozen fruit. I’ve always got fruit in the freezer; blueberries and bananas are staples but over summer I added mango flesh & lychee pulp to my stores and it was the lychee pulp I used to make my ice cream today. It’s sweet but hasn’t an overpowering flavour so it makes for the perfect ice cream to pair with other foods if you wish.

Now, I have to admit, I’ve done this plenty of times before, but with full-fat natural yoghurt. The plethora of gut friendly bacteria in yoghurt does make it a much healthier option but today I just didn’t want that tang. I love frozen yoghurt but I love ice cream more!

In typical fashion, I just threw every thing together in my Magic Bullet without measuring so I’m really guessing with quantities here… but I reckon I used about 1/3 cup of frozen lychee pulp & about 2 (hefty) tablespoons of Maleny Dairies pure cream. Maleny Dairies’ cream is the thickest natural cream I have ever come across so I’m going to add a disclaimer here and say that if you use ordinary, mass-produced pouring cream this recipe won’t work. If you buy your cream from the supermarket, I’m guessing you’ll be better off with ‘double’ or ‘thickened’ cream for this recipe. Similarly, if you’re thinking of trying this with coconut cream (vegans) it will have to be a really thick variety like Ayam brand …not the cheaper supermarket ones.

Simply throw them into your blender together, blend and scrape a couple of times and Bob’s your uncle! I served mine up in a dish with halved strawberries (see pic). You could pop it back in the freezer for awhile if you prefer it more solid… most home made ice cream is put through a number of alternating blend-and-freezes before serving. I just couldn’t wait that long! 😉

Blueberry Broccoli Leaf Smoothie

I have to admit that my broccoli plants here at home are a little bit of a disappointment. They haven’t really ‘performed’ yet – I’m still waiting for a ‘crop’. Sure, a few florets have popped up here and there, but they’re hardly enough for one meal.

So in the meantime, I’m culling the foliage (…um, also because I’m fighting a seemingly never-ending battle with aphids…) and rather than discard these nutrient dense leaves I try to find ways to get them into my body. Most people wouldn’t consider using broccoli leaves, but they are actually quite healthful: think kale. They’re very similar in texture (they actually belong to the same plant family – Brassica) …and like kale, one of the easiest ways to consume them quickly is to break ’em down in a blender.Food Fervour

Unable to find any exciting smoothie recipes that specifically included broccoli leaves, I ended up tweaking one I found on the site Pop Sugar, that asked for the vegetable itself. (Take a look here if you’re curious.) I substituted blueberries for the strawberries and completely forgot about adding yoghurt …but I think that was a blessing in disguise. The kicker was the peanut butter: I’ve never used it in a smoothie before, but …wow. I totally think it made this drink. One hundred percent.

Besides your trusty blender, you’ll need 1 frozen banana (chopped into chunks) 2 heaped teaspoons of peanut butter, ½ cup frozen blueberries and about 8 broccoli leaves (I used more because mine varied in size).

Throw it all in the blender with at least 1 cup of cold water (I added more after the first mix) then guzzle with glee.

It did occur to me that those with peanut/nut allergies could try substituting with tahini but having a much stronger flavour, I’m not sure if it would end up as tasty. If anyone decides to give it a go however, please let me know what happens!

Monkey Bread Breakfast

While Sunday seems like the right day for decadence, I’m really not sure my breakfast this morning fits the bill. It’s so ridiculously dessert-like that I’m… I’m almost feeling… guilty.Food Fervour

You see, yesterday I decided to try a recipe for something I’ve never (to my knowledge) eaten before: Monkey Bread. I’d been preparing my spelt sourdough from Jo Whitton’s Quirky Cooking, when on a whim, I decided to keep on cooking …I had the time and the ingredients (kind of)… and I chose her to try her monkey bread.

As with many of my yeast-based bread attempts, it didn’t seem to turn out the way it should have …according to photos of other Monkey Breads I’ve seen. But then, I did make a couple of small adaptations: I halved the quantities (that shouldn’t’ve mattered) added cinnamon to the dough (this neither) and finally used maple syrup in the ‘butter sauce’ instead of solid sugar granules (like rapadura or coconut sugars). That most certainly could have had some effect on the outcome. But I tell you what, I don’t regret it because I had a bit left over, and it was an integral element of my wicked breakfast today.

Suffice to say, it still tasted good (and I only ever throw out totally inedible foodstuffs) so after it had cooled right down, I cut it into slices and shoved it in the freezer for future consumption. No surprise that it ended up on my mind this morning. At first I envisaged trying to make French toast with it but laziness kicked in, and I opted for super simplicity: toasting (in the griller). No frypan to wash up, you see. 😉

It came together with just the following ingredients: two slices of monkey bread (you could use banana bread or slices of some other sweet loaf) one banana, a ‘scattering’ (small handful) of macadamia nuts, 2-3 heaped tablespoons of Greek yoghurt and about a tablespoon of the leftover vanilla-butter-maple syrup sauce (you could of course substitute with straight maple syrup, but you definitely will not need a whole tablespoon; try 2 teaspoons) (FYI, the ‘black bits’ in the sauce in the picture above are fragments of vanilla bean from my homemade vanilla paste.)

Toast the bread in the grill, whilst slicing up the banana. Break the toasted bread into chunks in your bowl, scatter over the banana slices and macadamias then top with the yoghurt. Finally drizzle over your sauce/syrup. You could scatter some berries on top as well for a burst of freshness (this came to me after I’d emptied the contents of the bowl into my body, dammit!)

If you give this a go, please let me know what you think: breakfast or dessert? 😉

French Toast Sandwich aka Cheat’s Pancakes

I usually opt for pancakes for Sunday brunch but today I was feeling a tad lazy (hey, I’ve been up since 5am surfing, cleaning & gardening… I’m entitled!) so what to do if you feel like pancakes but you can’t be bothered to make the batter and cook them?

Grab two slices of bread and an egg. French toast is dead simple and much quicker and easier to create than pancakes. All I needed to add was some elements for extra flavour, nutrient density and excitement…

So this is how it came together:

Since I keep my (variety of) breads in the freezer (pre-sliced) I had to pop two pieces in the toaster to thaw for a few seconds, so in the meantime, I set the frying pan on the stove on a medium-low temp, adding a splash of coconut oil. Setting the bread slices aside I then created the French toast batter by whisking together an egg, a dash of milk, a teaspoon of vanilla paste and a decent sprinkling of cinnamon in a cup.

Placing the two bread slices in the pan, I carefully poured about half of the egg mixture (that’s a quarter for each slice of bread) as evenly within the bounds of the crust of both pieces as possible, and after about a minute, turned them over with an egg slide to cook. Note: this method is actually a tad more difficult than your typical French toast procedure: normally you’d empty the egg mix into a shallow dish and soak the bread pieces before putting them in the frypan. My fiddly method keeps your crusts ‘crunchier’…

Next I grabbed a handful of hazelnuts, a dash of maple syrup, some more (rice) milk and cacao powder to make my hazelnut choc sandwich filling. Some minutes in the Magic Bullet – stopping regularly to check consistency and scrape down the sides – and that was done. Ready.

Returning to the pan, I divided the remaining egg mixture carefully again over the (other sides) of the bread slices, spreading the dregs of the mix (chunks of vanilla bean at the bottom of the cup) over the toast as well (waste not want not and …extra fibre!) before turning them for the last time.

While the second side cooked I grabbed my plate, then the tub of greek yogurt  and some fresh blueberries from the fridge…. ready to rumble! Once the toast was browned enough on the second side, I popped it on the plate, smearing a nice thick layer of the hazelnut choc mix onto one piece before topping it with the other slice. Dropping a couple of large dollops of yoghurt on top of the ‘sandwich’, I scooped the rest of the hazelnut spread on top and swirled them together with the end of the fork. Then it was simply time to pile on the blueberries, and get stuck in! Mmm, craving satisfied.Food Fervour

It was so rich that I know I won’t be able to eat again for many hours. To be honest, I think coconut cream (even though it may melt due to the meal’s warmth) may taste better than the yoghurt: while it’s good for some tartness (and probiotic qualities!) it’s somehow not quite complementary. If you decide to give this creation a go, let me know what you used and how it turned out 🙂


Cacao Blueberry ‘Ice Cream’

food fervourIn case you haven’t gathered by now, I’m a bit of an ice cream fan. I used to be crazy for it and, while I can still ‘slide’ back into the habit of buying commercial stuff (whether it be a small tub from the supermarket, or a few scoops from a gelati shop) on the odd occasion, I’ve become pretty well disciplined to experiment at home when the desire arises.

It’s actually quite surprising how easy it can be. If you have nuts (& a range of spices) in the pantry, a heap of ‘stuff’ in the freezer and a very powerful blender (mine’s a Thermomix) you can have ice cream in minutes; ice cream will be way better for you than any mass-produced product out there and that should easily satisfy a ‘craving’.

I’ve come across a wide variety of recipes for ‘alternative’ ice creams with the help of Google, so if you want to experiment further do a little research on the net. The most astonishing recipes I came across were for vegan ice creams made entirely from nuts… which really did work! Fat is the key to ice cream however, having said that, some fruits (particularly banana and mango) when frozen thicken beautifully in the blending process.

Drawing on these ideas, along with some others I’ve gained through the Thermomix community, I created this no-added-sugar “ice cream” with a handful of all-natural – mostly frozen – foodstuffs. I have an almost permanent store of frozen fruit and yoghurt cubes in my freezer, which means I’m well prepared to make ice cream at the drop of a hat. Now, if you don’t like yoghurt you can try freezing cubes of coconut milk (vegan option) or perhaps even ordinary cow’s milk (I’ve never tried this), but creams (dairy especially) tend to split when frozen so they’ll affect the texture of your finished product.

food fervour

ready-to-freeze yoghurt

Forewarning: don’t expect the smoothest ice cream texture (because of the extra, natural, ‘great-for-your-gut’ fibre in it) and it definitely isn’t as sweet as your commercial counterparts…

Armed with 20gm hazelnuts, 4 dates, 1 frozen banana (cut into chunks), ½ cup frozen blueberries, 100gm frozen yoghurt cubes (approx 8) 1 heaped tablespoon of cacao powder and 1 teaspoon vanilla paste (optional) I created a taste sensation that could have served 2 people… but I ate the whole lot!

Place the hazelnuts and dates (try more than 4 if you are a real sweet tooth) in a high powered blender and blast until the nuts become ‘meal’ (Thermies: 10 seconds, speed 9-10)

Scrape down the sides of the jug/bowl then add the rest of the ingredients: banana, blueberries, yoghurt/milk cubes, cacao & (optional) vanilla. Blend until smooth. This may take 2-3 rounds: repeat blending, stopping, scraping down and mixing a little by hand. (Thermies: I started around Speed 5 and worked my way up to Speed 9 over a 30 second period, stopped, scraped down & mixed then hit it again at Speed 9 for another 30 seconds)

It should be solid enough to dish out in balls that look like huge scoops of ice cream. I topped mine with cacao nibs (coz I love chocolate chip ice cream) and devoured it in a matter of minutes.

food fervour

Believe it or not, this is a ‘kale’ (& mango) ice cream, I made from a green smoothie base. 10/10 for imagination?

Let me know how you go, and please feel free to share your variations or own personal experiments 🙂

Cravings & Improvisation

I once heard somewhere that cravings can be your body’s way of alluding to a lack of certain nutrients: for example, a desire for ice cream could mean you need calcium. food fervourNice thought, but moreover, great excuse to abuse yourself! If you need calcium, won’t a glass of milk or handful of sesame seeds suffice? Nope!

Cravings can really only be tackled psychologically. You either talk yourself out of it (which may increase the danger of its return, more powerful than before) or you cave. Or, you could try doing what I have taught myself to do. It works hmm, maybe 90% of the time? And that’s a pretty good strike rate for someone who can really lack willpower when it comes to food.

It only takes a few minutes of focus; to analyse what exactly it is you want from the particular food or drink you are craving. What ‘characteristics’: flavour, texture, temperature. Savoury or sweet? Crunchy or creamy? Warm or cold? Moist or dry? Sometimes this very process can diminish the craving, but at the very least it buys you time: time to avoid the instant (& usually poor quality) gratification option.

I used to crave ice cream after dinner. But I can’t have the stuff in the house because – apart from knowing how rubbish it is for me – it wouldn’t last 24 hours. I can – and have – demolished a tub in one sitting. But by putting a little thought into it, I worked out that it was actually the cool, moist, sweet creaminess that my taste buds craved, not necessarily ice cream. So I turned an ice cream habit into a Greek yoghurt with fruit and/or nuts, and/or cacao habit, which I’ve actually blogged about previously: You Don’t NEED Ice Cream

food fervourToday’s lunch was the result of a little bit of analytical thought as well. I had cheese on my mind. And avocado. Now I’m a fan of cheese on toast (in fact, it’s a ‘swap-out’ I have used to satisfy a sausage roll craving a couple of times in the past, believe it or not – warm, savoury) but I wasn’t so “one-eyed-and-desperate” enough to settle on such a simple meal, when I could easily pack more nutrients (& fibre) into it by adding some extra elements.

So my toasted cheese and avocado sanger became a toasted cheese, avocado, tomato, cucumber & baby spinach sandwich. That totally satisfied me.


Coconut Chia Dairy Alternative

Breakfast on this fine Sunday morning has been both easy & decadent in the same breath. How good does this look?food fervour

While contemplating cooking a hot Sunday breakfast, I came across a container of soaked chia seeds I had forgotten I’d prepped earlier in the week. Bang! Instant gratification.

I could forget about the frypan or Thermomix now: I had organic blueberries & strawberries, banana and the ultimate (rare) decadence – some fresh cream. (Clearly I’M not vegan, but I sometimes prefer vegan meals…) That’s all it took to make my brekky. Minimal dish washing means more time to hang out my linen and wash my car. Yay :/

Had I not had the chia prepared, this breakfast wouldn’t’ve happened. Well, nowhere near as ‘instantly’. This is a perfect example of how a little bit of preparation can help you avoid “poor food choices” when you’re in a hurry, or simply just too impatient (“Need food NOW!”).

Chia seeds soaked in coconut cream (or milk) make a perfect vegan alternative to yoghurt or cream. And it’s ridiculously simple. The ratio is usually about 1 part chia seeds to 3 or 4 parts liquid, depending upon how ‘solid’ you like your yoghurts/creams. It’s as simple as mixing them together in a container (I always use glass) sealing and refrigerating for perhaps half an hour (or 2-3 days…how hungry are ya?!) Bob’s your Uncle.

The calcium, protein, Omegas in chia seeds make this just as good, if not better than the dairy alternatives. You can also play with this basic concoction in numerous ways, adding spices (vanilla, cinnamon for example) cacao and added natural sweeteners (if you HAVE to!) For more ideas Google ‘Chia Pudding’ and you’ll find a whole host of recipes.