Asparagus & Sprouted Lentils with Avocado Sauerkraut Mash

The key to healthy eating is experimentation. Really, it’s not that hard, with the bottomless supply of information available at your fingertips on the net. I reckon I search for recipes (food ideas) pretty much every day of the week.

Today’s lunch was no exception. I checked out what I had in the fridge – paying particular attention to the veggies that needed to be used up first – and dived right into Google (the best thing since sliced bread….if you want to call that the best thing…)

Asparagus and sprouted lentils were first up. I found an appealing recipe (5th from the top of the first results page). But my (OCD!?) desire for nutrient density meant I had to search further. So I entered avocado & sauerkraut (just getting into sauerkraut for the first time in my life, so am kind of at a loss as to what to do with it) and found this interesting little recipe…

Envisaging how the two separate dishes may just compliment each other, I set to work, and produced this:food fervour

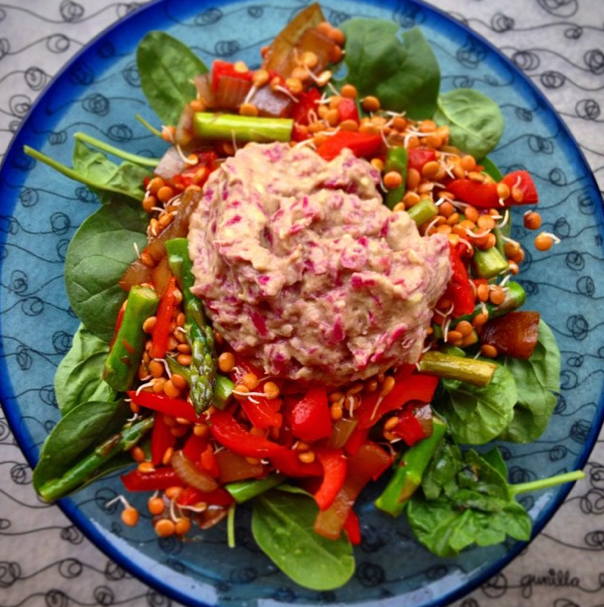
So, what’s in it? And in particular, what the hell is that stuff on top? It kinda looks like refried-beans-but-not? It’s actually avocado & sauerkraut.

I found the Sprouted Lentils with Asparagus recipe here, on the blog ‘My Own Private Kitchen’ and I altered very little: apart from the amounts (I’m ONE person) I omitted the basil, lemon juice, salt & pepper and I cooked in coconut oil instead. Oh yeah… and a lazy thing: I caramelised the onions in my Thermomix, per a recipe in Jo Whitton’s Quirky Cooking cookbook (making extra for later use, coz I LOVE caramelised onions).

The Avocado Sauerkraut Mash – on the website purelytwins.com – intrigued me. It’s so simple …but I found it needed something extra, and that extra was a dash of apple cider vinegar (lemon or lime juice might also do) for more, slightly sweeter, acidity. (I might’ve needed the added ‘oomph’ because my sauerkraut is homemade so could taste completely different – milder – than the stuff the twins use/d.)

To describe the processes super-briefly (for those who can’t be bothered visiting the links) here’s how it all came together:

Firstly I set the Thermomix to work on caramelising the onions for me (this takes about 20 minutes, the same amount of time as doing it yourself in a frypan) so I had time to prep my capsicum & asparagus. Frying them in coconut oil, over a medium heat for about 5 minutes, occasionally stirring, gave me time to make the ago mash simultaneously: halving an avocado, mashing & mixing it with 2 heaped tablespoons of sauerkraut. I pulled the veggies off the heat (leaving them in the frypan to ‘rest’) then mixed the (dash of) apple cider vinegar through the mash mixture and laid the bed of baby spinach on my plate. I added ½ cup of sprouted lentils straight into the frypan with the cooked capsicum & asparagus and stirred them through to warm. When the onions were done, I added about ¼ cup of them to the frypan, again mixing up the contents before placing them on top of the baby spinach. I scraped out every last bit of the avo sauerkraut mash from the mixing bowl and sat it on top of the lot.

It creates a visual feast, but you have to mix it all through when it’s time to consume: the sweetness of the onions and the capsicum counters & compliments the tang of the mash and there’s definitely one helluva lot of texture in the meal. You could also add a drizzle of olive oil and/or lemon juice if you prefer more moistness.

Raw Passionfruit Avocado Cheesecake

I’ve been admiring (& occasionally enjoying) the variety of raw cheesecakes that are slowly becoming more readily available at cafes and eateries, but had not bothered trying to make one even though I’ve been told many times that it’s ‘piece of cake’ (excuse the pun).

food fervourMy love of avocado has extended beyond its nutritional value because I’m now aware of its other ‘superpowers’! My first experience came with a green smoothie recipe. My how stuff ‘thickens up’ when you add this little dude to the mix! I noticed raw mousse recipes relied heavily upon avocado as well. That got me thinking about the texture and consistency of cheesecake.

Now I’m certainly by no means a pioneer in the avocado cheesecake world, but I can say it’s hard to find many raw cheesecake recipes on the net that employ ‘avos’ as the primary ingredient, which would indicate there’s heaps of room for experimentation. The vast majority use blended cashews as the ‘cream cheese’ base. I thought avocado would work because it’s naturally bland on the palate, but the PERFECT creamy texture.

Passionfruit isn’t necessarily a real favourite of mine, but they have been in season and moreover, they have a strong flavour …and a ‘tanginess’… which is what you find in an ordinary cheesecake. So I grabbed me some of ’em and got crackin’.

All 3 attempts were well received by a variety of tasters, but the last version was the best and it’s simply because I upped the amount of passionfruit. The stronger the fruit flavour, the better. But if you are going to play around here, I’ll just remind you that the more fruit, the more ‘wet’ the mixture = the less well the final product will set or hold together. (Think of fruit with maximum flavour, minimal moisture…)

I used macadamia nuts for the base (borrowing from a recipe from Jo Whitton’s Quirky Cooking blog) because I always associate them with the tropics (and passionfruit’s definitely tropical) but almonds worked fine in my initial experiment so be creative if you like!food fervour

For the Base you will need: 130gm macadamias, 70gm desiccated/shredded coconut, 8 dates & a pinch of Himalayan salt

Simply blend everything thoroughly in a high powered blender (Thermomixers 20 seconds @ Speed 9) then press the mix over the base of a well-oiled (coconut oil is best) springform cake tin. Note: this will make a thin base – if you like thick cheesecake bases I recommend you double the ingredients. Set aside (or refrigerate in warmer climates).

For the Filling, you will need: 2 large (or 3 small) avocados, 4-5 passionfruit (depending upon how strong you’d like the flavour) 4 tablespoons maple syrup or coconut sugar, 4 tablespoons (approx 60 gm) coconut oil (melted), 2-3 teaspoons vanilla paste, optional 1 banana &/or ½-1 teaspoon grated ginger

Again, this is simply a blending exercise. (Even with a Thermomix I found myself stopping and starting, to check consistency & taste and scrape down the mixture) Start with the avocados, sugar/syrup, vanilla & if using, the banana/ginger. Blend well (Thermies approximately 20 seconds, Speed 5) Add the passionfruit pulp, blending until smooth (Thermies 20 seconds, Speed 5 & you may use Reverse speed so the passionfruit seeds aren’t pulverised initially). Finally add the coconut oil blending well again (Thermies 20 seconds, Speed 9 gradually)

Empty the filling over the base, smoothing off as evenly as possible, then allow to set in the refrigerator for at least 20 minutes (or the freezer if you can’t wait that long!) Then serve and enjoy 🙂


Vegan Hot Chocolate

I’ve been struggling finding hot winter drinks that aren’t full of caffeine, sugar or cow’s milk. Let me tell you, it ain’t easy. I’ve been playing around, mulling over what goes with what, and I reckon I’ve hit upon some pretty cool ideas. The current ‘Bulletproof’ (butter) coffee fad has even come into play…

This particular version of my experimental ‘healthy’ hot chocolate drinks was inspired by Nutella. Most people know that Nutella is a hazelnut based chocolate spread. So I used hazelnut milk (made freshly in my Thermomix first, via recipe in the new Quirky Cooking cookbook) and tied the ‘Bulletproof’ idea in via the inclusion of coconut oil and my choice of sweetener, coconut sugar. NB: I’m actually sensitising my taste buds by eating so ‘cleanly’ so the flavours here will be subtle, which means you may want to alter the amounts of cacao and sweetener to your liking.

food fervour

Unfortunately, I have to admit that if you don’t own a Thermomix I can’t offer you an alternative, because this recipe involves a short burst of high speed blending of hot liquid – which is definitely not to be attempted in a normal blender. (If however, you’re adept in the kitchen, I’m confident you’ll discover alternative means to create something similar!)

For a single serve you will need: 250gm hazelnut milk, 3 tspns cacao powder, 3 tspns coconut sugar, 1 tspn coconut oil (optional).

Place all ingredients in the Thermomix, cooking for 8 minutes, at 70ºC on Speed 4. At the end of the cooking period, programme 30 seconds at Speed 8 to ‘froth’ the mixture. Serve immediately.

Let your imagination run wild. This recipe is really a basic formula for any number of creations. I have used a variety of milks and come up with some amazing flavours, for example, a Spicy version to which I added heaps of cinnamon, some nutmeg, vanilla, garam masala & chilli powder! 😀


Nutrient Dense Porridge

Let me start out by saying my motivation for this post was not the great breakfast I just had. It was the thought behind it; my general philosophy about food. If we are meant to be eating less (portion control) how are we meant to get all the nutrients in? By thinking. And being creative. Yes, you need a little education, but it’s really NOT hard. Here’s my example…

I’m not necessarily a porridge fan. I have found I usually digest it too quickly and can feel hungry again within 3 hours. This I put down to the fact that in cooking the oats, I’m removing some of the workload that my digestive system would otherwise be lumbered with, in breaking down the food. Now, in Winter it gets pretty hard chowing down on my usual bircher brekky: eating or drinking cold makes me cold from the inside, so I turn back to porridge (it’s the quickest thing to make before I start work, especially in the Thermomix). The question is, how to make it last longer?

Simple: add protein and/or healthy fats and/or fibre. Most of us know – or have surely heard by now – that fibre, protein & fats are satiating. Fibre & protein usually because of their ‘complexity’, fats because of their density. So my go-to porridge recipe is now a mix of oats and protein rich quinoa flakes & chia seeds, with whatever milk I’m feeling on the day. It has made a huge difference.

So my point is: get a little educated & be creative. Learn something about REAL foods and the nutrients they contain, especially those with the highest quantities (this is why I believe vegetables should be the base of the Food Pyramid: no other food group contains same the array & density as this plant matter) and it will be easy to find ways to slot them into your meals without having to eat them in ‘excess’. (And for the record, even though I don’t throw the word into my recipes, ‘organic’ choices are definitely first option.)food fervour

So with that, here’s the recipe for a (sizeable) single serve of this morning’s apple cinnamon & chia porridge:

½ grated apple, 35gm oats, 5-10gms quinoa flakes, 5gms (1 head teaspoon chia) seeds, 90gm water, 150gm milk of choice (today I used almond) 1 teaspoon cinnamon, coconut sugar to taste.

Stovetop cooks place apple, oats, quinoa & chia, water & milk into saucepan over a medium-low heat, reducing to simmer as the mixture begins to bubble. you’ll need to stir continuously. I honestly have forgotten how long it takes to make porridge on the stove top, but I would think it would be about 8-10 minutes, similar to the Thermomix cooking time.

Thermomixers you can ‘grate’ your apple in the bowl for 5 secs speed 5, or Turbo a couple of times. Then add the oats, quinoa, chia, water & milk, cooking for 8 mins, 90ºC reverse speed 2.

Serve immediately, stirring through the cinnamon with any extra milk you may or may not like to add and top with coconut sugar to taste *not TOO much*!

Coeliacs would evidently replace oats altogether, using 40-45gm quinoa flakes however since quinoa (& especially chia) will require more fluid you may need to almost double the fluid quantities. Stove-top cooks will be able to gauge the mixture thickening, Thermomix users won’t. Trial & error. That’s what it’s all about!

Orange Almond Smoothie

Eden Health Retreat has a number of citrus trees scattered around the grounds so in winter there is quite a bountiful supply of oranges, grapefruit & lemons at our disposal.

With a couple of these oranges hanging around in my fridge, I decided to make a liquid version of a gluten free favourite: the orange almond cake. I had had lunch, and was hankering for a little dessert.

Thinking about an amazing green chai coconut smoothie recipe created by Jo Whitton (Quirky Cooking), I pulled together an idea for a rich drink that didn’t require ANY added sugars. And it worked. Warning: it’s very rich so you won’t need much. The following makes approximately 500mls; enough for two people. (Unlike this one, who guzzled it all down herself…and is paying the price!)food fervour

You’ll need: 50gm almonds, 1 orange (navel oranges are naturally sweeter) with all skin and pith removed, 60-80gm coconut cream, a pinch each of nutmeg & cinnamon, 1-2 teaspoons vanilla essence/paste, 200gm coconut water.

In a blender or Thermomix, mill the almonds into meal (Thermies 10 seconds, speed 9) then add all the remaining ingredients blending thoroughly (Thermies 1½ minutes, speed 9). Serve & consume immediately!

Since it’s winter here on the Gold Coast, I didn’t want to add ice, but in summer it would be an ideal addition. If need be, you could substitute the coconut cream & water with just coconut milk, but you’ll lose all the added goodness in the coconut water (higher concentration of minerals in that, than in the flesh, which is what the milks and creams are made from). You could also throw in a little fresh ginger for added nutrient value!

Watercress & Cashew Dip

Out with the kale, and in with the watercress! I have to admit I am a bit of a trendite when it comes to nutrition, but my motives are pure; I simply try to consume the most nutrient-dense foods I can. And I don’t think it’s such a bad habit, training myself to include as many “super foods” in my diet as possible.

It was this chart on David Gillespie’s “Sweet Poison” Facebook page that changed my mind:

A Life in Words(David Gillespie sourced this from the following website: Centers for Disease Control & Prevention)

Don’t get me wrong, I’ll still eat kale. But I’m quite happy that my preferred leafy green – spinach – ranks higher in value!

But the fanatic I am, well, I HAVE to include it if it tops the list! So at the very next farmers market, I sought out a bunch of watercress… without considering exactly what I’d do with it. I’m not really into plain old sandwiches per se, and I’ve really only thrown it into green smoothies in the past. So I Googled. But the results were quite uninspiring.

It was while I was entertaining a couple of my closest girlfriends on the following weekend that the idea came to me: Dip! Surely if spinach and basil make decent ‘dip heroes’, why not watercress? As far as I could see, it was the best way to use a tonne of the stuff quickly. And since it’s quite fibrous, pulverising it in a powerful blender or Thermomix is ideal (as in green smoothies) because you can use more of the plant (stems etc). MORE fibre, less waste.food fervour

So I created a dip from the first spinach & cashew recipe I came across in a Google search. Watercress has a bitterness to it but also seems to leave your palate refreshed and I found that the cashews complimented it perfectly: countering the bitterness with their natural sweetness, without destroying the herb’s ‘freshness’.

It’s also dead easy: simply blend ⅓ cup cashews, 1 firmly packed cup of watercress (or a big handful!), ¼ cup olive oil, a decent dash of Himalayan salt & 1-2 tablespoons of lemon juice (to taste) until smooth. This may require a few pauses to scrape down the sides of the blender (or bowl if you use a Thermomix).

It also makes a great sandwich spread, and I even made a salad dressing of it by mixing in a little extra lemon juice & oil. What better way to pump up the nutritional value of other meals?

Turmeric Egg on Toast

I just rushed in from a resistance training session, and had to rush out again in minutes, so how was I going to re-fuel? Since it’s winter here, I’m loathe to make a protein smoothie in my Thermomix because it’ll chill me from within.

The quickest, warmest, high protein, healthy fats replacement is a boiled egg on toast. I boiled the jug ala Jamie Oliver style, popped the egg and water in a small saucepan and let the stovetop catch up while I pulled out an avocado and the frozen (gluten free) bread slice ….when I saw it. The frozen Turmeric bulb. How would that go with egg? Turns out: ….brilliantly.food fervour

I smashed half an avocado on the toast, spread the egg over the top, then finely grated turmeric over all of that. With some Himalayan salt (I love salty eggs) & the slimmest drizzle of olive oil, it tasted DIVINE. And I just upped the nutrient density and anti-inflammatory properties of my post-training fuel, with minimal effort.

Up there for thinkin’, down there for dancin’!


Mum’s Kifflitzers Re-Invented

I have an admission to make: until I got my Thermomix, I’d never made real custard. I’d either bought it ready-made or, worse, cooked up the powdered stuff. Yes, shocking I know. But, I learnt from my mum….monkey see, monkey do…

So when cleaning out my pantry one Sunday recently, I found a container of custard powder hiding at the back, and pulled it out to throw away. But then I had a ‘Moment’.

food fervour

I love my Mum’s handwriting…

I recalled some biscuits mum used to make that I loved: “Kifflitzers”. Custard powder was a ‘key’ ingredient. She’d given me the recipe (hand written of course) so as a tribute to her, I decided to make some before I ditched the processed rubbish for good. It’s kind of poetic and yet ironic: I’ll never see my mum again, and I’ll never buy custard powder again, so I’ll actually never make these biscuits according to this recipe again either. Even though they tasted SO GOOD…

My ‘obligatory’ changes to her original recipe, included opting for gluten free flour and vegan-friendly coconut oil instead of butter, and they turned out entirely different to Mum’s biccies, but still ridiculously more-ish. I have to add however, that some custard powders are NOT gluten free so check the ingredient list on the product packaging carefully.

My ingredient list included ⅔ cup Buckwheat flour, 125gm almond meal, ½ cup coconut sugar, 2 tablespoons custard powder, 90gms coconut oil (liquefied), 1 teaspoon vanilla (I used my homemade essence), approx 45gm almond milk.

The method is VERY simple. It takes less time than the oven takes to pre-heat (to 180ºC, by the way)! Because I’m a (proud) Thermomix owner, I freshly milled most of the dry ingredients first: placing the (⅔ cup) Buckwheat seeds and coconut sugar in together (approximately 10 seconds, Speed 9) then setting aside, so I could mill the (125gm) almonds into meal. I added the buckwheat & sugar mix back in to the Thermomix bowl, with the custard powder and mixed on speed 4 for a few seconds. For Non-Thermies, basically all you have to do is (sift &) mix all your dry ingredients together.food fervour

Add the vanilla, coconut oil & milk and mix well (Thermies 30 seconds, Speed 4-5) then mould spoonfuls onto oven trays lined with baking paper, with a little space between as they will flatten & spread during the cooking process. Bake for 10-20 minutes, depending upon your oven. Because of the high oil content, they will remain soft & ‘chewy’ even after cooling. Deeelish!


Deconstructed Apple Crumble

I have to admit I became a little distracted in my yoga class this afternoon. Somehow apples popped into my head (go figure?!) and my Samadhi was lost; the ‘Train of Thought’ left the station and a Craving was born. I was mulling over ideas for a warm apple dessert, but I knew an apple pie was out of the question. Waaaay too much time and effort.

So when I got home I looked up apple recipes in the Thermomix Recipe search engine, knowing that I was really looking for something ‘apple-crumble-ish’, to make it quick (minimal time between making and eating) but I realised they all still required oven baking. Pshhh!

So I decided to go with a ‘deconstruction’. As long as it was warm, I didn’t care.food fervour

For a single serve, one apple is plenty. I chopped it up roughly and threw it in the Thermie for a quick ‘Turbo’ smash-up (keeping the skin on – the more fibre the better!) then added about 10gms of water and set it to ‘stew’ for 3 minutes, 70ºC, Reverse Speed 2.

I popped the stewed apple straight into my serving dish (Thermie owners could put it in their Thermoservers to keep VERY warm, if you could be bothered to wash another item) showering it with ground cinnamon, then put 50gms walnuts in the bowl and chopped for about 6 seconds on speed 5-6. Adding 30gms coconut oil, 5-10gms coconut sugar and roughly a tablespoon (5gms) of psyllium husk I set it to cook for 2 minutes at 100ºC, Reverse Speed 2.

Scooping it straight into the dish with the apple, I poured in some fresh cream, garnishing with shredded coconut, then mixed it all up before taking the first spoonful. SO yummy. SO quick. SO satisfying. Instant gratification!

Kangaroo Bolognese

Some people can’t understand how I (or anyone) can eat our ‘national emblem’. The vegetarians’ and vegans’ opinions are justified but any other carnivore (or omnivore, for that matter) cannot complain about me eating ‘Skippy’ if they don’t think twice about eating ‘Daisy’, ‘Babe’ or Nemo!

Kangaroo meat is higher in protein than beef, naturally lower in fat as well, and provides the haem iron I choose to include in my diet. Added to the fact that it is considered ‘Game’ (wild caught) and therefore likely to be a much ‘cleaner’ source of animal protein to consume than the chemical-laden animals being farmed for bulk consumption.

From an anthropological perspective, humans evolved thanks to these kinds of meats: hunters (physically active people) originally had to chase down highly active creatures in order to eat. Daisy wasn’t docilely ‘grazing in the fields’ back then. It was suggested by one of my favourite fitness/nutrition/neuroscience gurus Paul Taylor that “you are the animal you eat”…

On with the story…

I picked up a kilo of kangaroo mince on sale and since I find the ‘mini-chore’ of divvying up individual portions kind of onerous, I decided to create something immediately to lighten my workload. I’m not usually a pasta fan, but somewhere along the line I’d bought some gluten free macaroni and since I’ve been trying to get rid of it (and cannot simply throw it out – wastage is a Sin!) for a while, “spag bol” came to mind.

Straight to the Thermie. Too. Easy. I literally walked in the door at 1:15pm and was eating by 2pm.food fervour

I threw 1 garlic clove, a roughly chopped brown onion, carrot & celery stem in the bowl and almost pulverised them (which ultimately resulted in a very smooth bolognese consistency) for 8 seconds on Speed 7. Then I threw in 20gm of olive oil, the 400gms of Skippy mince (instead of ‘Daisy’ & ‘Babe’) and various herbs (basil, nutmeg, parsley & a bay leaf) and set it on to cook for 10 minutes @ 100ºC, Reverse Speed 1.

In this time I apportioned the remaining kangaroo mince, put away the rest of the groceries and the already-used-ingredients, and pulled out the ones I had yet to use: red wine, tomato paste, tamari, the gluten free macaroni and parmesan cheese. And a zucchini, which I chopped up finely. (My usual bolognese recipe includes more vege – like capsicum & mushrooms – but I didn’t have my Thinking Cap on today. I was more interested in Time-Saving.)

food fervour

While the bolognese simmers away in the Thermomix, the Magic Bullet pulverises the parmesan…

Finally, I added the zucchini, 80gm red wine, 60gms water, 2 tspns tamari & about 300gm tomato paste, set the time to 16 minutes, again @ 100ºC, Reverse Speed 1 then set to work on the other elements:

Since I’m not yet an expert at multi-skilling with my Thermomix alone, I prepared the pasta to cook on the stovetop, boiling the electric jug first (ala Jamie Oliver-style) not just to speed up the process but also to minimise electricity usage a tad. Once the GF macaroni was bubbling away, I pulled out my handy little Magic Bullet, threw a chunk of parmesan in and grated that up in seconds. Everything was ready. I had time to begin the clean-up!

The alarm for my pasta went off literally seconds after the Thermie signalled she was done. Perfect timing. A heavy-duty meal – enough to feed four – complete within 45 minutes… Brilliant!