The Hardcore Green

I’ve mentioned quite a few times how great watercress is for you: it’s the most nutrient-dense plant food you can get. Yes, it beats kale and spinach.

Unlike spinach however, watercress (and kale for that matter) don’t rate highly on a palatability scale. Well, not mine anyway. But I will give watercress the time of day because of its nutrient status.

So finding things to do with it is pretty difficult. It’s quite peppery so you usually wouldn’t want to use much. Food Fervour
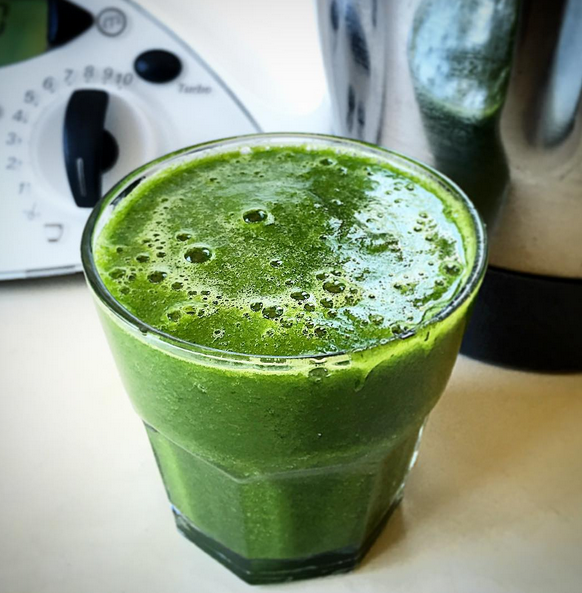
A little in salads, sometimes soups, but I usually always revert to smoothies. They’re easy, and I can tolerate a larger ‘dose’ …Sorry, I’m really making it sound like medicine, huh? But according to Hippocrates it is, so give me this over a pill anyday…

Today however, I went overboard. I’ll blame the seller at the farmer’s market: the bunch of watercress I got for just $2.50 was so huge I wasn’t able to fit it in my fridge. I typically resolve this kind of issue by using some immediately. Hello, breakfast!

Food Fervour
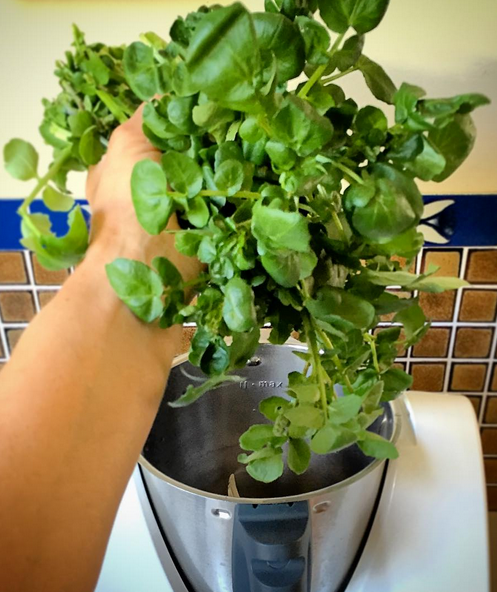
The problem was I had to chop one helluva lot off it to fit it in the placcy bag, in the fridge …see the pic: that’s the ‘handful’ in relation to my not-too-small (2 litre) Thermomix. If you are going to give this smoothie a go, I’d suggest you halve what I used. Unless you’re Hardcore. Like me. (Pffft!)

Simply blend a handful of watercress with the flesh of one mango, 200-300gm fresh pineapple (more or less, to taste: this is fruit that best ‘tempers’ the watercress) and 200mls of cold or coconut water. (Thermies, I blended it on speed 9 for 1 minute). Fresh mint may help to somewhat disguise the fiery watercress and will complement the tropical fruits as well.Food Fervour

Check out the rich green of my ‘hardcore’ (OD) watercress smoothie. Pretty colour but talk about a fire in my (throat and) belly!

Mushroom & Lentil Bolognaise Stew

With Winter smacking us in the face this week, I felt the need for a nice thick, warming stew. But having had (what I considered to be) too much meat for some days prior, I wanted something plant-based… that would satisfy me.

Knowing how damned good legumes are for us (very high fibre and plant-based protein) and having a bag of mushrooms in the fridge that I knew needed to be used up, I began the search for a recipe but as usual, nothing I found comprised a vast array of veggies. So, true to form, I ended up adapting; fusing two different recipes together: one Thermomix Lentil & Veg Stew with a Mushroom & Lentil Bolognaise recipe on taste.com.au.

While I chose to make this using my Thermomix, it could be easily replicated by non-Thermie cooks because it’s a one-pot recipe. But a word of warning to Thermomix users: the quantities I used brought the bowl contents right up to the maximum (2 litres) so if you’re a little reticent, perhaps halve the quantities. It will still result in a decent amount of stew.food fervour

Grab the following:

35ml extra virgin olive oil, 1 onion, 2 garlic cloves, 1 large carrot, 1 stalk celery, 2 potatoes, 170gm uncooked brown lentils, 200gm button mushrooms, 2 tablespoons Thermomix vegetable stock paste + 600gm water (non-Thermies use 700-800ml vegetable stock), 2 bay leaves, 400gm passata (or entire contents of a 400gm tin of tomatoes)

Thermomixers: Add the onion (quartered) garlic cloves, roughly chopped carrot and celery to the bowl and chop for 5 seconds @ Speed 5. Scrape down sides then cook for 3mins @ 100ºC on reverse Speed 1. Meanwhile, dice the potatoes and roughly chop the mushrooms. Scrape down the sides of the bowl, add the potatoes, mushrooms, lentils, stock paste, water, bay leaves and passata (or tomatoes). Stir gently before locking the lid in place and cooking for 45 minutes @ 100ºC on reverse Speed ‘Stir’, with the MC off and the basket (or a light dishcloth draped) over the top to catch splatters.

Stovetop Cooks: Finely chop the onion, garlic, carrot and celery, then warm the olive oil in a large saucepan over a medium heat. Add the veg and cook for 3-5 minutes (until onion has softened) stirring occasionally while you dice the potatoes & roughly chop the mushrooms. Add the potatoes, mushrooms, lentils, stock, bay leaves and passata (or tomatoes) to the saucepan and bring to a gentle boil before reducing to a simmer, partially covered for approximately 40 minutes.

Allow the stew to rest for at least 5 minutes (ThermoServers are the perfect receptacle) before serving so that the some fluid may be further absorbed by the lentils. It’s a perfect meal on its own, or with spiralised zucchini noodles, but you could add some pasta if you feel that you need “carbo-loading” 😉

Vegan Anzac Cheesecake

How the heck did I come up with this one?

Easy, really. While searching for a traditional Anzac biscuit recipe earlier in the week, I came across a recipe for an Anzac Cheesecake… a traditional, cheesy cheesecake. Since I love the raw cheesecake phenomenon, I instantly mulled over what ingredients I would use, to get the flavour of an Anzac biccie.

And what better tribute on this, the 100th Anniversary of the landing at Gallipoli? (For anyone outside of Australia or New Zealand who may not know what this means to us, take a look at this postFood Fervour

So where to start? Well, the traditional biscuits are primarily comprised of oats, flour, sugar, desiccated coconut, golden syrup (‘treacle’), butter and the result is a wonderful ‘caramel’ flavour. I could envisage the oats & desiccated coconut in the cheesecake base (sorry, this isn’t gluten free people: but you could easily substitute almonds or buckwheat instead) but what about the cheesy filling?

Well, raw foodies know that nuts can make great dairy substitutes, and almost every raw cheesecake recipe you find will use cashews for the filling. I like to buck trends sometimes. And this HAD to be an Aussie recipe. There was no better option than our native nut, the macadamia. Coconut cream and/or oil would work because coconut figures in the original biscuit recipe. The ideas flowed from there…

There are three stages to the cheesecake’s creation, and since one does involve cooking, I can no longer claim this as ‘raw’. Firstly, I made a salted caramel sauce (recipe sourced from Quirky Cooking – see here) then created the base, and finally the macadamia/coconut cream/salted caramel filling. And I was blown away by the result!food fervour

Please note: using a standard springform cake tin, I found that my cheesecake was rather flat which indicates I my quantities were too few. Having said this, I’ve decided to supply my original amounts anyway but I highly recommend you used a smaller dish… or double all the ingredients! (If you do that, can you let me know how it works out please?)

For the caramel sauce I used 50gm coconut sugar, 50gm coconut cream, 1 teaspoon vanilla extract & a good pinch of Himalayan Salt.

I put all of these in the Thermomix for 3mins @ 100º, speed 2. For those without this piece of equipment, I apologise but I can only guess that you would add all the ingredients into a small saucepan and stir continuously (probably for more than 3 minutes I imagine) until the mixture thickens. (Be careful you don’t let it go too long, it will burn quickly. But then, burnt caramel is another flavour in itself, and maybe it could work?!) Empty into a jug or cup and set aside.

For the cheesecake base I blended 1 cup of dates, ½ cup oats and ½ cup of desiccated coconut until fully granulated (Thermies up to 15 seconds, speed 9-10). Grease your dish with coconut oil, tip the base mixture in and using a spatula (or clean hands?) press firmly and evenly across the base. Place it in the refrigerator.

For the filling I played around a fair bit! But in the end I used: ¼ cup of the prepared salted caramel sauce (that’ll be almost the whole lot), 1 heaped cup of (approx. 250gm) macadamia nuts, ½ cup coconut cream, ¼ cup coconut oil.

Firstly, I milled the macadamias (Thermies 10sec, speed 9-10) then added the sauce, blending for about 10secs, from speed 5 increasing to 9) Next add the coconut cream and Thermomix or not, you’ll need to blend a few times, stopping to scrape down the sides. My thought was, the more you blend, the better the aeration of the coconut cream, as well as further milling the macadamia particles. Finally add the (liquified) coconut oil, and I let this one go at speed 9 for almost 40 seconds.

Pour the thick filling into your prepared base dish, then simply freeze. I left mine overnight so I would highly recommend you leave it for at least one hour. It may stick fast to the base of the dish so gently warm the base (melting the coconut oil you greased the dish with) and it should come out with a little more ease.

food fervourI garnished the finished product with a crumbled Anzac biscuit (I also make vegan versions of those) but leftover salted caramel sauce drizzled over the top is divine!


Raw Carrot Cake with Lime Cashew Icing

I’ve had this recipe earmarked to try for quite some time now… but it was only this week I found the (time &) motivation. Included in a handout from a raw food demonstration I attended years ago, I’d filed it away in a cooking folder, to sit idly waiting for me to visit it.

food fervourWell, this week, it was Time. And I was impressed with the result. As usual, I made a few alterations to the original recipe (including halving all the amounts) and I believe there is yet more room for improvement!

Apart from a powerful blender (I used my Thermomix and later, to fine tune the icing, the Magic Bullet) you will need:

1 cup brazil nuts, 5 medium carrots, ¼ cup dates, ¼ cup maple syrup (I actually used ‘date water’ which isn’t as sweet as the syrup so you may find you could reduce this amount) ½-1 teaspoon grated ginger, 1½ cups desiccated coconut, ¼ sultanas, 1½ tblspns psyllium husk

Mill the brazil nuts first (TM: 10secs, speed 9) and set aside, then grate the carrots (TM: 10-15secs, speed 5-6). Next, blend the dates, liquid sweetener & ginger (TM: up to 30secs, speed 7-9). Finally, add in the nut meal, carrots and remaining ingredients and mix well (TM: approx 1min, speed intermittent (knead) scraping down then mixing 30secs, reverse speed 4). Empty the mixture into into a greased (coconut oil) lined dish (the mixture perfectly filled a 15 x 20cm stoneware baking dish I have) pressing it in and smoothing it over. Refrigerate, or freeze if you prefer.

For the icing, mill ½ cup raw cashews (TM: 10 secs, speed 9) then add approximately 2-3 tablespoons of maple syrup (again, I used date water instead) the flesh & rind of half a lime and a dash of coconut oil. Blend well (TM: 30-60secs, up to speed 8. You will need to scrape down a few times. This is where I transferred the mixture to my Magic Bullet short cup for a smoother consistency). Simply spread over the top of the ‘cake’ and refrigerate (or freeze) until ready to devour!


Asparagus & Sprouted Lentils with Avocado Sauerkraut Mash

The key to healthy eating is experimentation. Really, it’s not that hard, with the bottomless supply of information available at your fingertips on the net. I reckon I search for recipes (food ideas) pretty much every day of the week.

Today’s lunch was no exception. I checked out what I had in the fridge – paying particular attention to the veggies that needed to be used up first – and dived right into Google (the best thing since sliced bread….if you want to call that the best thing…)

Asparagus and sprouted lentils were first up. I found an appealing recipe (5th from the top of the first results page). But my (OCD!?) desire for nutrient density meant I had to search further. So I entered avocado & sauerkraut (just getting into sauerkraut for the first time in my life, so am kind of at a loss as to what to do with it) and found this interesting little recipe…

Envisaging how the two separate dishes may just compliment each other, I set to work, and produced this:food fervour

So, what’s in it? And in particular, what the hell is that stuff on top? It kinda looks like refried-beans-but-not? It’s actually avocado & sauerkraut.

I found the Sprouted Lentils with Asparagus recipe here, on the blog ‘My Own Private Kitchen’ and I altered very little: apart from the amounts (I’m ONE person) I omitted the basil, lemon juice, salt & pepper and I cooked in coconut oil instead. Oh yeah… and a lazy thing: I caramelised the onions in my Thermomix, per a recipe in Jo Whitton’s Quirky Cooking cookbook (making extra for later use, coz I LOVE caramelised onions).

The Avocado Sauerkraut Mash – on the website purelytwins.com – intrigued me. It’s so simple …but I found it needed something extra, and that extra was a dash of apple cider vinegar (lemon or lime juice might also do) for more, slightly sweeter, acidity. (I might’ve needed the added ‘oomph’ because my sauerkraut is homemade so could taste completely different – milder – than the stuff the twins use/d.)

To describe the processes super-briefly (for those who can’t be bothered visiting the links) here’s how it all came together:

Firstly I set the Thermomix to work on caramelising the onions for me (this takes about 20 minutes, the same amount of time as doing it yourself in a frypan) so I had time to prep my capsicum & asparagus. Frying them in coconut oil, over a medium heat for about 5 minutes, occasionally stirring, gave me time to make the ago mash simultaneously: halving an avocado, mashing & mixing it with 2 heaped tablespoons of sauerkraut. I pulled the veggies off the heat (leaving them in the frypan to ‘rest’) then mixed the (dash of) apple cider vinegar through the mash mixture and laid the bed of baby spinach on my plate. I added ½ cup of sprouted lentils straight into the frypan with the cooked capsicum & asparagus and stirred them through to warm. When the onions were done, I added about ¼ cup of them to the frypan, again mixing up the contents before placing them on top of the baby spinach. I scraped out every last bit of the avo sauerkraut mash from the mixing bowl and sat it on top of the lot.

It creates a visual feast, but you have to mix it all through when it’s time to consume: the sweetness of the onions and the capsicum counters & compliments the tang of the mash and there’s definitely one helluva lot of texture in the meal. You could also add a drizzle of olive oil and/or lemon juice if you prefer more moistness.

Apple, Mint & Watercress Coconut Lassi

Glancing at my herb pots as I walked in from yoga this afternoon, I noticed how well my watercress was doing. So well that it looked like it might be beginning to suffocate my curly parsley. That’s not ideal. My mint has bounced back again too (it is temperamental sometimes) and I was suddenly struck by wonder: do watercress and mint go well together? Surely they do?

food fervour

The apple & melon lassi from one of my recipe books

Watercress, as I have mentioned before (in a previous post, see here) has been recently crowned the most nutrent-dense plant food, so I am pretty keen on getting it into mah belly as much as possible …and away from my poor parsley plant. Mint is a renowned ant-acid. And both herbs have a fiery ‘freshness’ about them.

Since I wasn’t overly hungry, I decided a drink was all I needed right now and my train of thought led me from the usual option – a smoothie – to the memory of a particular recipe I knew I had somewhere in one of my books. ‘Apple’ and ‘mint’ were swimming around my head while I checked recipe book indexes. Then I found it. A Lassi.

So I set about re-creating the apple & melon lassi recipe with my own, preferred ingredients and was totally chuffed with the result.

For one large serving, you’ll need 1 peeled, cored, chopped apple (you could keep the skin on if organic, as long as your blender is high-powered enough to break it down) 1 banana (mine was frozen) a handful of mint leaves, a handful of watercress leaves, approx 60gm of coconut cream and 200gm coconut water. (NB: fluid measures in grams because I use a Thermomix.)

food fervourSimply throw everything in and blend until smooth. (Thermies: 1½ minutes at Speed 9) It is so refreshing!

Besides your run-of-the-mill mint variety, I also have some chocolate mint growing in the same pot so included that in my ‘handful’. You could vary the concentrations of coconut cream & water to alter thickness, but I think the more cream you use, the less intense the apple & herbs flavours may be. I have considered how a nip of vodka or apple schnapps might alter the creation, but I know the truth is, it would most likely negate all the nutritional benefits of the greens…!


Coconut Chia Dairy Alternative

Breakfast on this fine Sunday morning has been both easy & decadent in the same breath. How good does this look?food fervour

While contemplating cooking a hot Sunday breakfast, I came across a container of soaked chia seeds I had forgotten I’d prepped earlier in the week. Bang! Instant gratification.

I could forget about the frypan or Thermomix now: I had organic blueberries & strawberries, banana and the ultimate (rare) decadence – some fresh cream. (Clearly I’M not vegan, but I sometimes prefer vegan meals…) That’s all it took to make my brekky. Minimal dish washing means more time to hang out my linen and wash my car. Yay :/

Had I not had the chia prepared, this breakfast wouldn’t’ve happened. Well, nowhere near as ‘instantly’. This is a perfect example of how a little bit of preparation can help you avoid “poor food choices” when you’re in a hurry, or simply just too impatient (“Need food NOW!”).

Chia seeds soaked in coconut cream (or milk) make a perfect vegan alternative to yoghurt or cream. And it’s ridiculously simple. The ratio is usually about 1 part chia seeds to 3 or 4 parts liquid, depending upon how ‘solid’ you like your yoghurts/creams. It’s as simple as mixing them together in a container (I always use glass) sealing and refrigerating for perhaps half an hour (or 2-3 days…how hungry are ya?!) Bob’s your Uncle.

The calcium, protein, Omegas in chia seeds make this just as good, if not better than the dairy alternatives. You can also play with this basic concoction in numerous ways, adding spices (vanilla, cinnamon for example) cacao and added natural sweeteners (if you HAVE to!) For more ideas Google ‘Chia Pudding’ and you’ll find a whole host of recipes.

Vegan Hot Chocolate

I’ve been struggling finding hot winter drinks that aren’t full of caffeine, sugar or cow’s milk. Let me tell you, it ain’t easy. I’ve been playing around, mulling over what goes with what, and I reckon I’ve hit upon some pretty cool ideas. The current ‘Bulletproof’ (butter) coffee fad has even come into play…

This particular version of my experimental ‘healthy’ hot chocolate drinks was inspired by Nutella. Most people know that Nutella is a hazelnut based chocolate spread. So I used hazelnut milk (made freshly in my Thermomix first, via recipe in the new Quirky Cooking cookbook) and tied the ‘Bulletproof’ idea in via the inclusion of coconut oil and my choice of sweetener, coconut sugar. NB: I’m actually sensitising my taste buds by eating so ‘cleanly’ so the flavours here will be subtle, which means you may want to alter the amounts of cacao and sweetener to your liking.

food fervour

Unfortunately, I have to admit that if you don’t own a Thermomix I can’t offer you an alternative, because this recipe involves a short burst of high speed blending of hot liquid – which is definitely not to be attempted in a normal blender. (If however, you’re adept in the kitchen, I’m confident you’ll discover alternative means to create something similar!)

For a single serve you will need: 250gm hazelnut milk, 3 tspns cacao powder, 3 tspns coconut sugar, 1 tspn coconut oil (optional).

Place all ingredients in the Thermomix, cooking for 8 minutes, at 70ºC on Speed 4. At the end of the cooking period, programme 30 seconds at Speed 8 to ‘froth’ the mixture. Serve immediately.

Let your imagination run wild. This recipe is really a basic formula for any number of creations. I have used a variety of milks and come up with some amazing flavours, for example, a Spicy version to which I added heaps of cinnamon, some nutmeg, vanilla, garam masala & chilli powder! 😀


Nutrient Dense Porridge

Let me start out by saying my motivation for this post was not the great breakfast I just had. It was the thought behind it; my general philosophy about food. If we are meant to be eating less (portion control) how are we meant to get all the nutrients in? By thinking. And being creative. Yes, you need a little education, but it’s really NOT hard. Here’s my example…

I’m not necessarily a porridge fan. I have found I usually digest it too quickly and can feel hungry again within 3 hours. This I put down to the fact that in cooking the oats, I’m removing some of the workload that my digestive system would otherwise be lumbered with, in breaking down the food. Now, in Winter it gets pretty hard chowing down on my usual bircher brekky: eating or drinking cold makes me cold from the inside, so I turn back to porridge (it’s the quickest thing to make before I start work, especially in the Thermomix). The question is, how to make it last longer?

Simple: add protein and/or healthy fats and/or fibre. Most of us know – or have surely heard by now – that fibre, protein & fats are satiating. Fibre & protein usually because of their ‘complexity’, fats because of their density. So my go-to porridge recipe is now a mix of oats and protein rich quinoa flakes & chia seeds, with whatever milk I’m feeling on the day. It has made a huge difference.

So my point is: get a little educated & be creative. Learn something about REAL foods and the nutrients they contain, especially those with the highest quantities (this is why I believe vegetables should be the base of the Food Pyramid: no other food group contains same the array & density as this plant matter) and it will be easy to find ways to slot them into your meals without having to eat them in ‘excess’. (And for the record, even though I don’t throw the word into my recipes, ‘organic’ choices are definitely first option.)food fervour

So with that, here’s the recipe for a (sizeable) single serve of this morning’s apple cinnamon & chia porridge:

½ grated apple, 35gm oats, 5-10gms quinoa flakes, 5gms (1 head teaspoon chia) seeds, 90gm water, 150gm milk of choice (today I used almond) 1 teaspoon cinnamon, coconut sugar to taste.

Stovetop cooks place apple, oats, quinoa & chia, water & milk into saucepan over a medium-low heat, reducing to simmer as the mixture begins to bubble. you’ll need to stir continuously. I honestly have forgotten how long it takes to make porridge on the stove top, but I would think it would be about 8-10 minutes, similar to the Thermomix cooking time.

Thermomixers you can ‘grate’ your apple in the bowl for 5 secs speed 5, or Turbo a couple of times. Then add the oats, quinoa, chia, water & milk, cooking for 8 mins, 90ºC reverse speed 2.

Serve immediately, stirring through the cinnamon with any extra milk you may or may not like to add and top with coconut sugar to taste *not TOO much*!

Coeliacs would evidently replace oats altogether, using 40-45gm quinoa flakes however since quinoa (& especially chia) will require more fluid you may need to almost double the fluid quantities. Stove-top cooks will be able to gauge the mixture thickening, Thermomix users won’t. Trial & error. That’s what it’s all about!

Orange Almond Smoothie

Eden Health Retreat has a number of citrus trees scattered around the grounds so in winter there is quite a bountiful supply of oranges, grapefruit & lemons at our disposal.

With a couple of these oranges hanging around in my fridge, I decided to make a liquid version of a gluten free favourite: the orange almond cake. I had had lunch, and was hankering for a little dessert.

Thinking about an amazing green chai coconut smoothie recipe created by Jo Whitton (Quirky Cooking), I pulled together an idea for a rich drink that didn’t require ANY added sugars. And it worked. Warning: it’s very rich so you won’t need much. The following makes approximately 500mls; enough for two people. (Unlike this one, who guzzled it all down herself…and is paying the price!)food fervour

You’ll need: 50gm almonds, 1 orange (navel oranges are naturally sweeter) with all skin and pith removed, 60-80gm coconut cream, a pinch each of nutmeg & cinnamon, 1-2 teaspoons vanilla essence/paste, 200gm coconut water.

In a blender or Thermomix, mill the almonds into meal (Thermies 10 seconds, speed 9) then add all the remaining ingredients blending thoroughly (Thermies 1½ minutes, speed 9). Serve & consume immediately!

Since it’s winter here on the Gold Coast, I didn’t want to add ice, but in summer it would be an ideal addition. If need be, you could substitute the coconut cream & water with just coconut milk, but you’ll lose all the added goodness in the coconut water (higher concentration of minerals in that, than in the flesh, which is what the milks and creams are made from). You could also throw in a little fresh ginger for added nutrient value!