Healthy Fried Brown Rice

Fried Rice rarely features in my diet, and you wouldn’t catch me dead buying it from a takeaway joint. But on the odd occasion, when I’m not so fussed about consuming a decent amount of starchy carbs… like tonight, after a couple of drinks with some girlfriends… I may be inclined to cook some up as an alternative to takeaway; a ‘healthy junk food’ option.

With some pre-cooked brown rice already in the fridge, this was a pretty easy cook-up for a slightly inebriated person. There’s a fair bit of variety in fried rice recipes but they pretty much all consist of rice, veggies and some protein, seasoned with ketcap manis (a thick, sweet soy sauce). So I happily pulled out almost every vegetable in the fridge, some eggs & bacon, garlic, ginger and a little turmeric to boot. Because of its sugar content however, ketcap manis doesn’t feature in my pantry, so I use Tamari (a wheat-free soy sauce) instead and hardly notice the difference.food fervour

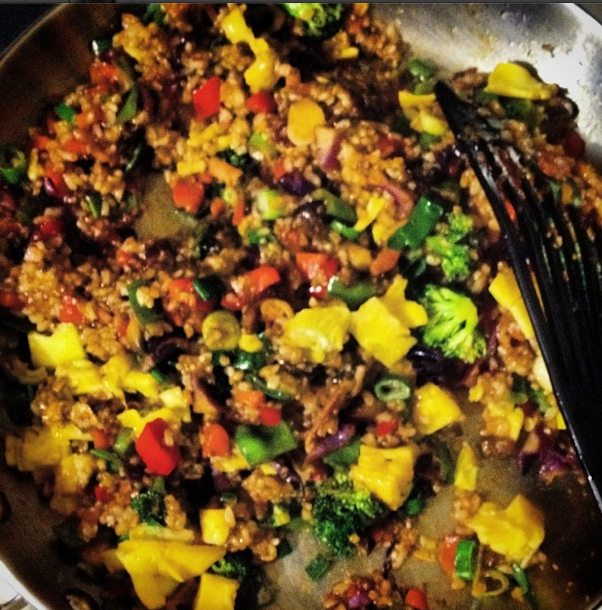
The following makes 2 serves: 1-2 tablespoons coconut oil for frying, 2 lightly beaten eggs, 1 small carrot (diced) 1 finely chopped garlic clove, 1 teaspoon fresh grated ginger, 8 chopped mushrooms, 1 heaped tablespoon finely diced bacon, ½ teaspoon fresh grated turmeric, ¼ red capsicum (diced), 1-1½ cups cooked brown rice, 2-3 tablespoons Tamari (or to taste) 8 thinly sliced snowpeas, ¼ cup shredded red cabbage, ¼ cup broccoli florets, 1 large shallot (thinly sliced)

Firstly cook the ‘omelette’ by adding the beaten eggs to some of the oil in a frypan over a medium-low heat for approximately 2-3 minutes (until just set). Remove from the pan and set aside. Increase the heat to medium, add some more oil, the carrot, garlic & ginger, and cook for about 2 minutes, stirring. Add the mushrooms & bacon (more oil if needed at this stage) and cook until the mushrooms have softened. Add the turmeric and capsicum next, stirring for another minute before adding the rice, Tamari, snow peas, cabbage & broccoli. Stir fry for another 3 minutes, then roughly chop up the reserved omelette, adding it with the sliced shallot for another minute. Serve immediately.

Experiment with your ingredients. If you’re unsure what to use, Google a few recipes for ideas. You almost can’t go wrong!


Vegan Hot Chocolate

I’ve been struggling finding hot winter drinks that aren’t full of caffeine, sugar or cow’s milk. Let me tell you, it ain’t easy. I’ve been playing around, mulling over what goes with what, and I reckon I’ve hit upon some pretty cool ideas. The current ‘Bulletproof’ (butter) coffee fad has even come into play…

This particular version of my experimental ‘healthy’ hot chocolate drinks was inspired by Nutella. Most people know that Nutella is a hazelnut based chocolate spread. So I used hazelnut milk (made freshly in my Thermomix first, via recipe in the new Quirky Cooking cookbook) and tied the ‘Bulletproof’ idea in via the inclusion of coconut oil and my choice of sweetener, coconut sugar. NB: I’m actually sensitising my taste buds by eating so ‘cleanly’ so the flavours here will be subtle, which means you may want to alter the amounts of cacao and sweetener to your liking.

food fervour

Unfortunately, I have to admit that if you don’t own a Thermomix I can’t offer you an alternative, because this recipe involves a short burst of high speed blending of hot liquid – which is definitely not to be attempted in a normal blender. (If however, you’re adept in the kitchen, I’m confident you’ll discover alternative means to create something similar!)

For a single serve you will need: 250gm hazelnut milk, 3 tspns cacao powder, 3 tspns coconut sugar, 1 tspn coconut oil (optional).

Place all ingredients in the Thermomix, cooking for 8 minutes, at 70ºC on Speed 4. At the end of the cooking period, programme 30 seconds at Speed 8 to ‘froth’ the mixture. Serve immediately.

Let your imagination run wild. This recipe is really a basic formula for any number of creations. I have used a variety of milks and come up with some amazing flavours, for example, a Spicy version to which I added heaps of cinnamon, some nutmeg, vanilla, garam masala & chilli powder! 😀


Nutrient Dense Porridge

Let me start out by saying my motivation for this post was not the great breakfast I just had. It was the thought behind it; my general philosophy about food. If we are meant to be eating less (portion control) how are we meant to get all the nutrients in? By thinking. And being creative. Yes, you need a little education, but it’s really NOT hard. Here’s my example…

I’m not necessarily a porridge fan. I have found I usually digest it too quickly and can feel hungry again within 3 hours. This I put down to the fact that in cooking the oats, I’m removing some of the workload that my digestive system would otherwise be lumbered with, in breaking down the food. Now, in Winter it gets pretty hard chowing down on my usual bircher brekky: eating or drinking cold makes me cold from the inside, so I turn back to porridge (it’s the quickest thing to make before I start work, especially in the Thermomix). The question is, how to make it last longer?

Simple: add protein and/or healthy fats and/or fibre. Most of us know – or have surely heard by now – that fibre, protein & fats are satiating. Fibre & protein usually because of their ‘complexity’, fats because of their density. So my go-to porridge recipe is now a mix of oats and protein rich quinoa flakes & chia seeds, with whatever milk I’m feeling on the day. It has made a huge difference.

So my point is: get a little educated & be creative. Learn something about REAL foods and the nutrients they contain, especially those with the highest quantities (this is why I believe vegetables should be the base of the Food Pyramid: no other food group contains same the array & density as this plant matter) and it will be easy to find ways to slot them into your meals without having to eat them in ‘excess’. (And for the record, even though I don’t throw the word into my recipes, ‘organic’ choices are definitely first option.)food fervour

So with that, here’s the recipe for a (sizeable) single serve of this morning’s apple cinnamon & chia porridge:

½ grated apple, 35gm oats, 5-10gms quinoa flakes, 5gms (1 head teaspoon chia) seeds, 90gm water, 150gm milk of choice (today I used almond) 1 teaspoon cinnamon, coconut sugar to taste.

Stovetop cooks place apple, oats, quinoa & chia, water & milk into saucepan over a medium-low heat, reducing to simmer as the mixture begins to bubble. you’ll need to stir continuously. I honestly have forgotten how long it takes to make porridge on the stove top, but I would think it would be about 8-10 minutes, similar to the Thermomix cooking time.

Thermomixers you can ‘grate’ your apple in the bowl for 5 secs speed 5, or Turbo a couple of times. Then add the oats, quinoa, chia, water & milk, cooking for 8 mins, 90ºC reverse speed 2.

Serve immediately, stirring through the cinnamon with any extra milk you may or may not like to add and top with coconut sugar to taste *not TOO much*!

Coeliacs would evidently replace oats altogether, using 40-45gm quinoa flakes however since quinoa (& especially chia) will require more fluid you may need to almost double the fluid quantities. Stove-top cooks will be able to gauge the mixture thickening, Thermomix users won’t. Trial & error. That’s what it’s all about!

Orange Almond Smoothie

Eden Health Retreat has a number of citrus trees scattered around the grounds so in winter there is quite a bountiful supply of oranges, grapefruit & lemons at our disposal.

With a couple of these oranges hanging around in my fridge, I decided to make a liquid version of a gluten free favourite: the orange almond cake. I had had lunch, and was hankering for a little dessert.

Thinking about an amazing green chai coconut smoothie recipe created by Jo Whitton (Quirky Cooking), I pulled together an idea for a rich drink that didn’t require ANY added sugars. And it worked. Warning: it’s very rich so you won’t need much. The following makes approximately 500mls; enough for two people. (Unlike this one, who guzzled it all down herself…and is paying the price!)food fervour

You’ll need: 50gm almonds, 1 orange (navel oranges are naturally sweeter) with all skin and pith removed, 60-80gm coconut cream, a pinch each of nutmeg & cinnamon, 1-2 teaspoons vanilla essence/paste, 200gm coconut water.

In a blender or Thermomix, mill the almonds into meal (Thermies 10 seconds, speed 9) then add all the remaining ingredients blending thoroughly (Thermies 1½ minutes, speed 9). Serve & consume immediately!

Since it’s winter here on the Gold Coast, I didn’t want to add ice, but in summer it would be an ideal addition. If need be, you could substitute the coconut cream & water with just coconut milk, but you’ll lose all the added goodness in the coconut water (higher concentration of minerals in that, than in the flesh, which is what the milks and creams are made from). You could also throw in a little fresh ginger for added nutrient value!

Watercress & Cashew Dip

Out with the kale, and in with the watercress! I have to admit I am a bit of a trendite when it comes to nutrition, but my motives are pure; I simply try to consume the most nutrient-dense foods I can. And I don’t think it’s such a bad habit, training myself to include as many “super foods” in my diet as possible.

It was this chart on David Gillespie’s “Sweet Poison” Facebook page that changed my mind:

A Life in Words(David Gillespie sourced this from the following website: Centers for Disease Control & Prevention)

Don’t get me wrong, I’ll still eat kale. But I’m quite happy that my preferred leafy green – spinach – ranks higher in value!

But the fanatic I am, well, I HAVE to include it if it tops the list! So at the very next farmers market, I sought out a bunch of watercress… without considering exactly what I’d do with it. I’m not really into plain old sandwiches per se, and I’ve really only thrown it into green smoothies in the past. So I Googled. But the results were quite uninspiring.

It was while I was entertaining a couple of my closest girlfriends on the following weekend that the idea came to me: Dip! Surely if spinach and basil make decent ‘dip heroes’, why not watercress? As far as I could see, it was the best way to use a tonne of the stuff quickly. And since it’s quite fibrous, pulverising it in a powerful blender or Thermomix is ideal (as in green smoothies) because you can use more of the plant (stems etc). MORE fibre, less waste.food fervour

So I created a dip from the first spinach & cashew recipe I came across in a Google search. Watercress has a bitterness to it but also seems to leave your palate refreshed and I found that the cashews complimented it perfectly: countering the bitterness with their natural sweetness, without destroying the herb’s ‘freshness’.

It’s also dead easy: simply blend ⅓ cup cashews, 1 firmly packed cup of watercress (or a big handful!), ¼ cup olive oil, a decent dash of Himalayan salt & 1-2 tablespoons of lemon juice (to taste) until smooth. This may require a few pauses to scrape down the sides of the blender (or bowl if you use a Thermomix).

It also makes a great sandwich spread, and I even made a salad dressing of it by mixing in a little extra lemon juice & oil. What better way to pump up the nutritional value of other meals?

Turmeric Egg on Toast

I just rushed in from a resistance training session, and had to rush out again in minutes, so how was I going to re-fuel? Since it’s winter here, I’m loathe to make a protein smoothie in my Thermomix because it’ll chill me from within.

The quickest, warmest, high protein, healthy fats replacement is a boiled egg on toast. I boiled the jug ala Jamie Oliver style, popped the egg and water in a small saucepan and let the stovetop catch up while I pulled out an avocado and the frozen (gluten free) bread slice ….when I saw it. The frozen Turmeric bulb. How would that go with egg? Turns out: ….brilliantly.food fervour

I smashed half an avocado on the toast, spread the egg over the top, then finely grated turmeric over all of that. With some Himalayan salt (I love salty eggs) & the slimmest drizzle of olive oil, it tasted DIVINE. And I just upped the nutrient density and anti-inflammatory properties of my post-training fuel, with minimal effort.

Up there for thinkin’, down there for dancin’!


The Decadent Porridge

It’s my birthday. And I’m starting the day’s celebrations (after putting on a washload & cleaning some windows!) with a dish I usually reserve for ‘pudding’. It’s a simple quinoa porridge, which literally takes MINUTES to make. It’s the addition of the cacao powder that makes it feel more like a dessert, although there’s absolutely NO reason cacao needs to be associated only with sweets. Unlike your processed chocolates or cocoa powder, its nutrient content is much greater – notably its mineral density, in particular potassium & magnesium. Well, that’s what I always tell myself when I add it to anything!food fervour

All you need to do for a single serve, is throw ¼ cup of quinoa flakes into a saucepan over a low heat, with approximately ⅔ cup of your choice of milk (I usually use rice milk, but opted for almond today. Cow’s milk just takes a fraction longer to heat up) and be ready to stir vigorously as the milk approaches boiling because it will bubble and splatter! It really doesn’t need too long at all, perhaps 1-2 minutes; it will thicken quickly.

Remove from the heat, fold through 2-3 teaspoons cacao powder (to your taste) and your choice of sweetener (I use maple syrup or coconut sugar, and only 1-2 teaspoons at that) and serve.

You might want to add extra milk if it ends up thicker than you’d prefer. This morning I added strawberries & a little dollop of Greek yoghurt (which I don’t think worked so well :/ ) but for normally, for ‘dessert’, I’d eat it straight out of the saucepan!!!


Mum’s Kifflitzers Re-Invented

I have an admission to make: until I got my Thermomix, I’d never made real custard. I’d either bought it ready-made or, worse, cooked up the powdered stuff. Yes, shocking I know. But, I learnt from my mum….monkey see, monkey do…

So when cleaning out my pantry one Sunday recently, I found a container of custard powder hiding at the back, and pulled it out to throw away. But then I had a ‘Moment’.

food fervour

I love my Mum’s handwriting…

I recalled some biscuits mum used to make that I loved: “Kifflitzers”. Custard powder was a ‘key’ ingredient. She’d given me the recipe (hand written of course) so as a tribute to her, I decided to make some before I ditched the processed rubbish for good. It’s kind of poetic and yet ironic: I’ll never see my mum again, and I’ll never buy custard powder again, so I’ll actually never make these biscuits according to this recipe again either. Even though they tasted SO GOOD…

My ‘obligatory’ changes to her original recipe, included opting for gluten free flour and vegan-friendly coconut oil instead of butter, and they turned out entirely different to Mum’s biccies, but still ridiculously more-ish. I have to add however, that some custard powders are NOT gluten free so check the ingredient list on the product packaging carefully.

My ingredient list included ⅔ cup Buckwheat flour, 125gm almond meal, ½ cup coconut sugar, 2 tablespoons custard powder, 90gms coconut oil (liquefied), 1 teaspoon vanilla (I used my homemade essence), approx 45gm almond milk.

The method is VERY simple. It takes less time than the oven takes to pre-heat (to 180ºC, by the way)! Because I’m a (proud) Thermomix owner, I freshly milled most of the dry ingredients first: placing the (⅔ cup) Buckwheat seeds and coconut sugar in together (approximately 10 seconds, Speed 9) then setting aside, so I could mill the (125gm) almonds into meal. I added the buckwheat & sugar mix back in to the Thermomix bowl, with the custard powder and mixed on speed 4 for a few seconds. For Non-Thermies, basically all you have to do is (sift &) mix all your dry ingredients together.food fervour

Add the vanilla, coconut oil & milk and mix well (Thermies 30 seconds, Speed 4-5) then mould spoonfuls onto oven trays lined with baking paper, with a little space between as they will flatten & spread during the cooking process. Bake for 10-20 minutes, depending upon your oven. Because of the high oil content, they will remain soft & ‘chewy’ even after cooling. Deeelish!


Deconstructed Apple Crumble

I have to admit I became a little distracted in my yoga class this afternoon. Somehow apples popped into my head (go figure?!) and my Samadhi was lost; the ‘Train of Thought’ left the station and a Craving was born. I was mulling over ideas for a warm apple dessert, but I knew an apple pie was out of the question. Waaaay too much time and effort.

So when I got home I looked up apple recipes in the Thermomix Recipe search engine, knowing that I was really looking for something ‘apple-crumble-ish’, to make it quick (minimal time between making and eating) but I realised they all still required oven baking. Pshhh!

So I decided to go with a ‘deconstruction’. As long as it was warm, I didn’t care.food fervour

For a single serve, one apple is plenty. I chopped it up roughly and threw it in the Thermie for a quick ‘Turbo’ smash-up (keeping the skin on – the more fibre the better!) then added about 10gms of water and set it to ‘stew’ for 3 minutes, 70ºC, Reverse Speed 2.

I popped the stewed apple straight into my serving dish (Thermie owners could put it in their Thermoservers to keep VERY warm, if you could be bothered to wash another item) showering it with ground cinnamon, then put 50gms walnuts in the bowl and chopped for about 6 seconds on speed 5-6. Adding 30gms coconut oil, 5-10gms coconut sugar and roughly a tablespoon (5gms) of psyllium husk I set it to cook for 2 minutes at 100ºC, Reverse Speed 2.

Scooping it straight into the dish with the apple, I poured in some fresh cream, garnishing with shredded coconut, then mixed it all up before taking the first spoonful. SO yummy. SO quick. SO satisfying. Instant gratification!

Baby Kale & Custard Apple Smoothie

Feeling like a green smoothie just now, I opened up the fridge and found half of a custard apple staring back at me. “Hmmm” I thought, “I haven’t tried anything with one of these little fellows yet”.

food fervourWell-ripened custard apples are pretty sweet, so chances are you won’t need to add sweeteners to this smoothie. Well, I didn’t.

I threw a big handful of some baby kale leaves (a first time purchase at the farmer’s markets last week) in my Magic Bullet, peeled and de-seeded the custard apple half and added it with one super-heaped teaspoon of my homemade vanilla bean paste, a good dash of ground cinnamon, nutmeg and about a cup of unsweetened almond milk.

Because custard apple has a slightly grainy texture I made sure I blended it well. Still a trace of ‘graininess’ but the taste trumped that. Quick, easy, yum.