Mushroom, Broccoli & Kale Quinoa

I love one pot recipes …they’re (usually) ridiculously easy and best of all, there’s minimal cleaning up! Being pushed for time to cook my evening meal this afternoon, there was an even better reason to take this ‘short cut’.

Since my kale plant was in need of harvesting I searched for kale recipes, with quinoa. I was pretty lucky to come across a vegan recipe that included broccoli as well, first go. But because the recipe asked for cauliflower – which I didn’t have – I was going to have to make some changes. What a surprise!

While it easily satisfied me for a main meal, I reckon it would work well as a side dish, if you’re looking for something substantial (or ‘hearty’).Food Fervour

You’ll need: 1 cup quinoa (pre-soaked or well rinsed) 1 finely chopped onion, 1 finely chopped garlic clove, extra virgin olive oil (EVOO), 1 tablespoon curry powder/paste (I used a massaman paste) 130gms (approx 6 large) sliced mushrooms, 2 cups (500mls) vegetable stock, 200gm broccoli florets, 40gm finely chopped/shredded kale

Warm the EVOO in a large saucepan, over a medium heat. Add the onion and garlic and cook for 2-3 minutes. Mix in the curry powder or paste next and cook for another minute, until fragrant. Finally add the mushrooms and cook for another 2-3 minutes.

Pop the quinoa into the mix and stir well to coat, then add the stock. Bring it to a boil then drop the heat immediately back to a medium temperature. Let it simmer away (occasionally stirring to prevent anything sticking to the base of the pan) for 13-15 minutes.

Mix in the broccoli and kale, then cover and cook for a further 2-3 minutes. Remove the cover to steam off any excess liquid if necessary (stirring occasionally) otherwise, serve it right up immediately and enjoy!Food Fervour

I have to admit, I didn’t find the curry flavour very strong at all so I had no qualms about sprinkling some nutritional yeast over the top… To. Die. For!


Veggie Stack

When you’re not particularly hungry, nor inclined to spend a heap of time cooking, but you’re aware that you need to eat some veggies, know that vegetable stacks are pretty easy… and are a relatively easy clean up! Here’s one I threw together a few nights ago:

Food FervourExcuse my (lack of) modesty but damn, it looks kinda good! 😛 And it definitely hit the spot, to boot.

I’m going to describe what I did to create this delicious dish, but bear in mind my directions may be a little askew …not just because I’m a bit hopeless at recording what I do, but also because every grill is different: you’re best off keeping a keen eye on it, checking the contents regularly.

Firstly, I cut 3 slices of eggplant (about 1-1½cm thickness), salting them (both sides) and leaving them to rest, then I switched on the grill (high) and filled a small saucepan about 1cm deep with water, over high heat on the stove. While it was coming to a boil, I cut a 1-1½cm thick slice of butternut pumpkin (from the top end, where it’s solid fruit flesh, not the seed cavity) and trimmed off the thin skin, then popped it in the saucepan. Once boiling, I turned the heat down to low, so the pumpkin could simmer.

I next cut 2 quarters of a red capsicum (trimming the ends and removing seeds and veins), rubbed them with extra virgin olive oil (EVOO) and placed them skin-side up under the grill.  Waiting for the skins to blacken, I grabbed haloumi and baby spinach leaves from the fridge and pine nuts & my beloved caramelised balsamic vinegar from the pantry. Then I cut 3 (approx 5mm thick) slices of the cheese.

Turning the pumpkin slice over in the saucepan, I checked the capsicum: it was charring nicely. I washed the salt from the eggplant slices, patted them dry with paper towel then rubbed them with EVOO as well. The capsicum was ready to turn under the grill so I made room for the eggplant slices too.

Fishing the pumpkin out of the saucepan (it was just softened; not all the way through) I dried it off with some paper towel then oiled it with the EVOO (yeah, it was still pretty warm but I have pretty tough, heat-resilient finger pads!) so it was ready to take the place of the capsicum under the grill. When it seemed soft enough, I made the swap – turning the eggplant over at the same time – and let the capsicum rest skin side up on the chopping board. Unlike me, it’s best to exercise patience if you can and wait for the capsicum to cool before you try to remove the burnt skin. The common way to do this is with clingwrap but I use a small paring knife and my fingers to lift, peel and cut off the stubborn bits. Apart from impatience and/or laziness, I prefer not to use the clingwrap method for environmental and health reasons.

When the eggplant was ready to remove, the haloumi slices took their place and I turned over the pumpkin. From here on in, it was a waiting game, by the grill, knowing the cheese wouldn’t need too long under the heat. I took the pumpkin and haloumi out at the same time, but when I turned off the grill I popped the pine nuts under it. You see, I always burn pine nuts …because I forget about them. So under a cooling grill they’re more likely to end up lightly toasted than charred.

Food fervourI started assembling the stack with some baby spinach leaves on the plate, underneath the pumpkin (but I’ve also thrown them in between layers (see pic right) then laid down an eggplant slice, followed by haloumi and then the capsicum, repeating again and finishing with the last eggplant and haloumi slices. I drizzled my caramelised balsamic vinegar over the top (if you can’t get your hands on this delicacy simply add 1 tablespoon of EVOO and 2 teaspoons of balsamic vinegar to a small jar, tighten the cap and shake vigorously) then sprinkled the pine nuts over the top.

It can prove interesting trying to cut into the stack in a way that allows you to get all of the layers in one fork-full but that should be the least of your worries. A ‘deconstructed’ stack tastes just as good. 😉

Black Beans & Quinoa ‘Casserole’

I’ve got a ‘thing’ for black beans lately. Maybe it’s simply because they seem to be in vogue at the moment, but what I keep thinking of is their colour: it’s almost a nutritional fact that the richest, deepest coloured plant foods seem to be the most nutrient dense. Also known as turtle beans, they’re a ridiculously good source of protein, fibre, some vitamins & minerals. So I have a very large jar of them in my pantry. Because I don’t buy tinned products, I don’t even know if you can get these fellas pre-cooked in Australian supermarkets; I mean, I’ve never looked. I prefer to DIY. Y’know, prepare ‘from scratch’.Food Fervour

Because they’re a relatively new to my repertoire, I’m not quite sure what to do with them. Mexican predominantly comes to mind when I’m pondering what to make, but I often just throw them into salads as well. This time however, I wanted warm comfort food …and quinoa. I’d noticed a few black-bean-and-quinoa recipes floating around the net in the past, so I was confident I’d find something I wanted. And I did: three recipes, all quite similar… so I literally flipped between windows/tabs during the cook.

Having previously soaked, then slow cooked (overnight) the black beans, they were now ready to go. (Unfortunately I can’t recall the dry weight I began with, however I was lucky enough to have the exact quantity required for the recipe(s!) ….250gms.

This makes an absolute tonne, so as a single person I got about 4-5 meals out of it… and it tastes great cold so you don’t need to reheat it every time you want some. I should imagine it would freeze well too if you’d prefer to do that.

The ingredients I used were as follows:
a good dollop of EVOO, 1 diced onion, 1-2 finely chopped garlic cloves, ¾ cup (well) rinsed quinoa, 1 teaspoon cumin, ½ teaspoon chili powder, 1½ cups vege stock, black pepper & salt to taste, corn kernels (I used frozen) 250gm pre-soaked & cooked black beans, 200gm baby spinach.

In a large saucepan (over medium heat) add the oil then the onion and garlic, cooking for about 3 minutes or until the onion softens.

Add the quinoa, blending with the oil, onion & garlic, then add the cumin, chili powder, vegetable stock and black pepper. Give it a mix, increase the heat and once it has come to a boil, drop the heat back to low, pop on the lid and let it simmer for 20 minutes. Give it an occasional stir (mainly to loosen anything sticking to the saucepan base).

Finally, add the corn, beans and baby spinach, stirring gently then covering again for about 5-10 minutes …however long it takes to warm the beans, wilt the spinach and thaw the corn (if using frozen, like me).

Food FervourTo serve, use your imagination! You could easily just hoe in as it is, but I like to add more nutrients, so I went with a ‘warm salad’ theme and topped my serve with chopped avocado, fresh chopped tomato and crumbled feta. For a Mexican feel you could substitute my idea with (home made!) guacamole, (homemade!) tomato salsa and grated cheese ….as well as bit of sour cream (oooh! I just realised this would make a delicious vegetarian nachos topping!)

The next day I ate a serve cold, topped with freshly steamed broccoli, more feta (!) and a boiled egg for extra protein (pictured above). Go crazy …and don’t forget to let me know what you create. 😉


Cauliflower Pizza Bases

Food FervourI was skeptical about this notion when I first heard of it. Could cauliflower really imitate a dough base and hold together under the weight of all those toppings? I had to try for myself. And I was completely surprised (and smitten) when I made my first one. Now I can’t look back. Whilst they’re neither a thin crunchy base, nor a thick chewy, doughy one, they do manage to hold together well enough to support all your toppings (and I usually pile on way more than you’d get in your typical takeaway pizza). They are…. amazeballs.

Why opt for cauliflower over grain-dough bases? My primary reason is because it’s a vegetable. Whilst I prefer not to demonise foods, I would choose a vegetable over a grain in this case purely for its nutritional content. In general veggies provide more nutrient density and variety. And then there’s the fact that cauliflower’s pretty much starch (complex carbohydrate) -free compared to dough, which matters if you are ‘watching your weight’. Finally, there’s the gluten issue: this is perfect for coeliacs or the gluten intolerant.

Food Fervour

Chopped fresh flat leaf parsley features in this cauliflower pizza base

And best of all, you only need – at the very least – TWO ingredients: cauliflower and eggs. Many cauliflower pizza base recipes will include more than two, but they really are optional: the vegetable and eggs on their own will work just fine …but it is fun to play around with add-ins. I’ve experimented with a few of the following: obviously salt & pepper, but also chopped/dried herbs, grated cheese, tomato paste and I just LOVE nutritional yeast flakes (idea borrowed from Lee Holmes’ Supercharged Food).

It’s such a simple procedure, however the success of your base will be largely determined during one specific step. Here’s the method, based on 500gm cauliflower and 2 eggs:

Pre-heat Oven to 200ºC and line a baking tray with baking paper. Set aside.

Steam Cauliflower florets:

Manually: In a medium/large saucepan, bring add approx 2-3cm of water to the boil over high heat (cover with the lid to expediate this or better still, add boiling water from a freshly boiled electric jug to a large saucepan on the stovetop, on high heat). Add the florets, drop the heat back to simmer and keep the lid on the saucepan. Your cauliflower should cook in 4-5 minutes (check softness with a utensil). Thermomixers: Add 500gm of water to bowl then place cauliflower florets in basket. Programme 14 minutes, Varoma, speed 1-1.5.

Remove Excess fluid from the Cauliflower (this is the crucial step):

Allow cauliflower to cool (you can rinse under cold water to expediate this). Drain all excess water from the florets then roughly chop or mash the cauliflower (in the same saucepan …to save on dish-washing). Thermomixers can simply chop at Speed 5 or Turbo for a few seconds). Empty it all into the centre of a clean cotton tea towel, then, pulling the sides up, begin to squeeze out as much excess water as possible …into the sink for drainage (or over a bowl if you like to conserve your veggie water). The volume of cauliflower will pretty much halve in size. The more fluid you extract, the firmer your pizza base will be.

The Ingredient Mix:

Food Fervour

Tomato (paste) pizza base spread with fresh basil pesto, ready for toppings…

Manually: Return the mashed cauliflower to a bowl (scraping the veggie fibre from the tea towel – waste not, want not!) add the eggs and whatever else you’d like to add to the base, and mix thoroughly. Thermomixers: pop it all into the bowl and blend up to Speed 5 for about 10 seconds (you may want to scrape down the bowl down in between?)

Shape & Cook:

Tip the mixture into the centre of the paper-lined tray, and use a spatula to shape your pizza base. Aim for about ½-cm in thickness.

Pop into the oven and cook for 20 minutes, earmarking to turn the base over at about the halfway mark if possible.

Toppings:

Use the 20 minutes base cooking time to prepare your toppings. I’ll often fry up some mushrooms, preservative free bacon, capsicum and/or zucchini… I’ll boil the electric jug again and blanche some asparagus or broccoli… or make some basil pesto to use as the pizza base spread. You can grate your cheese now as well, so that you’re one hundred percent ready to dress the base.

Food Fervour

Leftover lunch slice of bacon & mushroom pizza

Once the base is done, and your toppings are spread, pop the pizza back in the oven for 7-10 minutes. It goes without saying, you need to serve immediately …but I have successfully refrigerated uneaten portions to enjoy for lunch the next day, just as you might do with a commercial pizza.

These really are the Bomb! If you are in the Gold Coast region, you can book a FoodPT with me to watch me demonstrate this procedure (it’s one of my most popular classes) and you get to eat the results. Find my contact details on the ‘Menu’ Page.


Monkey Bread Breakfast

While Sunday seems like the right day for decadence, I’m really not sure my breakfast this morning fits the bill. It’s so ridiculously dessert-like that I’m… I’m almost feeling… guilty.Food Fervour

You see, yesterday I decided to try a recipe for something I’ve never (to my knowledge) eaten before: Monkey Bread. I’d been preparing my spelt sourdough from Jo Whitton’s Quirky Cooking, when on a whim, I decided to keep on cooking …I had the time and the ingredients (kind of)… and I chose her to try her monkey bread.

As with many of my yeast-based bread attempts, it didn’t seem to turn out the way it should have …according to photos of other Monkey Breads I’ve seen. But then, I did make a couple of small adaptations: I halved the quantities (that shouldn’t’ve mattered) added cinnamon to the dough (this neither) and finally used maple syrup in the ‘butter sauce’ instead of solid sugar granules (like rapadura or coconut sugars). That most certainly could have had some effect on the outcome. But I tell you what, I don’t regret it because I had a bit left over, and it was an integral element of my wicked breakfast today.

Suffice to say, it still tasted good (and I only ever throw out totally inedible foodstuffs) so after it had cooled right down, I cut it into slices and shoved it in the freezer for future consumption. No surprise that it ended up on my mind this morning. At first I envisaged trying to make French toast with it but laziness kicked in, and I opted for super simplicity: toasting (in the griller). No frypan to wash up, you see. 😉

It came together with just the following ingredients: two slices of monkey bread (you could use banana bread or slices of some other sweet loaf) one banana, a ‘scattering’ (small handful) of macadamia nuts, 2-3 heaped tablespoons of Greek yoghurt and about a tablespoon of the leftover vanilla-butter-maple syrup sauce (you could of course substitute with straight maple syrup, but you definitely will not need a whole tablespoon; try 2 teaspoons) (FYI, the ‘black bits’ in the sauce in the picture above are fragments of vanilla bean from my homemade vanilla paste.)

Toast the bread in the grill, whilst slicing up the banana. Break the toasted bread into chunks in your bowl, scatter over the banana slices and macadamias then top with the yoghurt. Finally drizzle over your sauce/syrup. You could scatter some berries on top as well for a burst of freshness (this came to me after I’d emptied the contents of the bowl into my body, dammit!)

If you give this a go, please let me know what you think: breakfast or dessert? 😉

Avocado, Tomato & Cheddar Salad

As I’ve said before, salads are the quickest, easiest way to pack a wide variety of nutrients into one meal (see my ‘How To’ post,

The Quickest, Easiest Nutrient-Dense Meal

) and since it’s so humid today, I’m feeling lazier than usual. So salad for lunch it is. Cutting board, check. Knife, check. Bowl, check.

Food FervourCraving some cheese, (I’ve started buying vintage cheddars because I love the sharp saltiness of aged ‘tasties’) I decided to run with a traditional popular combo, cheese ‘n’ tomato. And since avocado is so good for you, as well as complementing both of these foods, it had to feature prominently too.

So, starting with a handful of watercress (you could use any green leaf you like) half a lebanese cucumber, quarter of a red capsicum, half a large avocado and 6 baby roma (or cherry) tomatoes, I roughly chopped them all ….chewing on a stick of celery at the same time… before gently tossing them in the bowl. Slicing about 40gms of vintage cheddar from the block, I used the wide-grater (see the photo) to ‘shave’ the cheese then, adding it to the bowl with a drizzle of extra virgin olive oil (EVOO) and a dash of apple cider vinegar, I tossed the lot together with a little more gusto. A dash of ground black pepper and Himalayan salt and I was ready to dig in.

For something so simple, it’s a rich mix of flavour and texture: creamy, salty, moist and sweet all at once. But best of all, is it’s wonderfully filling thanks to the high fibre and healthy fat content.

An Eclectic Rainbow Salad

Variety is the spice of Life. It also happens to be really good for your body.

That’s why it’s one of the drivers behind the meals I make: the greater the variety of food in a meal, the higher its nutritional content (generally speaking). That’s why ‘they’ say “Eat a Rainbow”.

Well, today’s lunch certainly nailed the colour bit. Which is interesting, considering it all began with a thought about boiled eggs as I drove home from yoga. You see, I often boil a few up and keep them in the fridge (…for moments just like these – instant gratification meals). Mum used to make an avocado, tomato & cottage cheese salad that I loved and even though it didn’t relate directly to my egg craving, I began to envisage a meal based on this combination.Food Fervour

This is how it came together:

Scattering a large handful of roughly chopped baby spinach on my plate, I then topped it with 3 quartered cherry tomatoes, 2 quartered hard boiled eggs, about 5cm of chopped lebanese cucumber and chunks of flesh from ½ large avocado.

Next I piled on about 3 heaped tablespoons of (my homemade) sauerkraut to please my gut bacteria, then a mound (approximately 2 tablespoons) of grated vintage cheddar …simply because it goes so well with avo and sauerkraut (have you ever tried a Reuben’s Sandwich? Here’s a link to my recipe for one of them:

A Probiotic Toastie?

)

That’s kind of edgy enough for a salad but I felt like pushing the boundaries a bit further so, instead of my standard vinegar & oil dressing, I drizzled the plain EVOO (extra virgin olive oil) over everything but followed it with a dollop of homemade sweet chilli sauce on the top. And if that wasn’t daring enough, I sprinkled approximately a dessertspoon of nutritional yeast flakes over the whole lot. BOOM. Gut-lovin’!

Now admittedly, even before I tucked in, it crossed my mind that I might’ve gone too far: gone overboard with elements & confused the flavours …but I wasn’t disappointed. I ate the lot. Maybe I was too hungry to notice whether the flavours really worked together or not? So please, by all means, if you decide to try this meal for yourself, and you come to a different conclusion, feel free to remind me that sometimes nutrient density should take a backseat to simplicity…

French Toast Sandwich aka Cheat’s Pancakes

I usually opt for pancakes for Sunday brunch but today I was feeling a tad lazy (hey, I’ve been up since 5am surfing, cleaning & gardening… I’m entitled!) so what to do if you feel like pancakes but you can’t be bothered to make the batter and cook them?

Grab two slices of bread and an egg. French toast is dead simple and much quicker and easier to create than pancakes. All I needed to add was some elements for extra flavour, nutrient density and excitement…

So this is how it came together:

Since I keep my (variety of) breads in the freezer (pre-sliced) I had to pop two pieces in the toaster to thaw for a few seconds, so in the meantime, I set the frying pan on the stove on a medium-low temp, adding a splash of coconut oil. Setting the bread slices aside I then created the French toast batter by whisking together an egg, a dash of milk, a teaspoon of vanilla paste and a decent sprinkling of cinnamon in a cup.

Placing the two bread slices in the pan, I carefully poured about half of the egg mixture (that’s a quarter for each slice of bread) as evenly within the bounds of the crust of both pieces as possible, and after about a minute, turned them over with an egg slide to cook. Note: this method is actually a tad more difficult than your typical French toast procedure: normally you’d empty the egg mix into a shallow dish and soak the bread pieces before putting them in the frypan. My fiddly method keeps your crusts ‘crunchier’…

Next I grabbed a handful of hazelnuts, a dash of maple syrup, some more (rice) milk and cacao powder to make my hazelnut choc sandwich filling. Some minutes in the Magic Bullet – stopping regularly to check consistency and scrape down the sides – and that was done. Ready.

Returning to the pan, I divided the remaining egg mixture carefully again over the (other sides) of the bread slices, spreading the dregs of the mix (chunks of vanilla bean at the bottom of the cup) over the toast as well (waste not want not and …extra fibre!) before turning them for the last time.

While the second side cooked I grabbed my plate, then the tub of greek yogurt  and some fresh blueberries from the fridge…. ready to rumble! Once the toast was browned enough on the second side, I popped it on the plate, smearing a nice thick layer of the hazelnut choc mix onto one piece before topping it with the other slice. Dropping a couple of large dollops of yoghurt on top of the ‘sandwich’, I scooped the rest of the hazelnut spread on top and swirled them together with the end of the fork. Then it was simply time to pile on the blueberries, and get stuck in! Mmm, craving satisfied.Food Fervour

It was so rich that I know I won’t be able to eat again for many hours. To be honest, I think coconut cream (even though it may melt due to the meal’s warmth) may taste better than the yoghurt: while it’s good for some tartness (and probiotic qualities!) it’s somehow not quite complementary. If you decide to give this creation a go, let me know what you used and how it turned out 🙂


Orange Salmon Salad

Gotta say, I’m pretty bloody pleased with this one. I’ve had salmon and orange together before but this will be memorable.Food Fervour

It began with my usual Google search: orange + salmon + salad + recipes. Most of the results were just marinades for salmon, not a complete meal, per se. But one in particular gave me an idea… and all it began with was orange and honey.

Now, I usually try to avoid adding sweeteners (even great natural ones like raw honey) where possible, but this marinade/dressing was going to need some, the way it was coming together in my head: orange rind can be quite bitter…

I started out by grating some rind from a navel orange (approximately one heaped teaspoon’s worth at a guess) then about the same amount of grated ginger. Cutting the top third from a navel orange, I hand squeezed the juice into a dish with the rind & ginger, then added a heaped teaspoon of raw honey, one teaspoon of tamari, and about a tablespoon of macadamia oil. After a good mix, I submerged my salmon steak in it. This began as the marinade but doubled as the salad dressing.

While the grill heated and the fish marinated, I scattered a mix of baby spinach, fresh basil & mint leaves on my plate, then grabbed some snow peas, celery, cucumber and cabbage out of the fridge. Popping the salmon in the grill, (skin side up) I set to finely chopping said veggies, then layered them over the greens.

I segmented the remainder of the orange as the salmon skin began to blacken, and after turning it over, decided to add a leftover avocado half, so sliced that and laid it on top of the salad pile. After placing the finished salmon steak on top, I scattered the orange segments and some roughly chopped up shallot greens, before dousing the whole thing with the remaining marinade. Then devouring.

It’s definitely the leaf combination and the dressing ingredients that made this dish so delicious. (I imagine a light sprinkling of crumbled feta would be fantastic too.) Whilst I haven’t provided a literal recipe here, I’d urge you to give it a go (in case you hadn’t noticed, the ingredients are all in bold typeface to give you a helping hand) because these flavours ….just amazing!

The Quickest, Easiest Nutrient-Dense Meal

Don’t you just love those ads that appear on almost every website, enticing you click, to find out what “5 foods you should never eat”? It’s laughable. Oh I have gone there, never you mind. Pretty much every time you are subjected to some long-winded video that culminates in no answer but a sales pitch.

Food Fervour

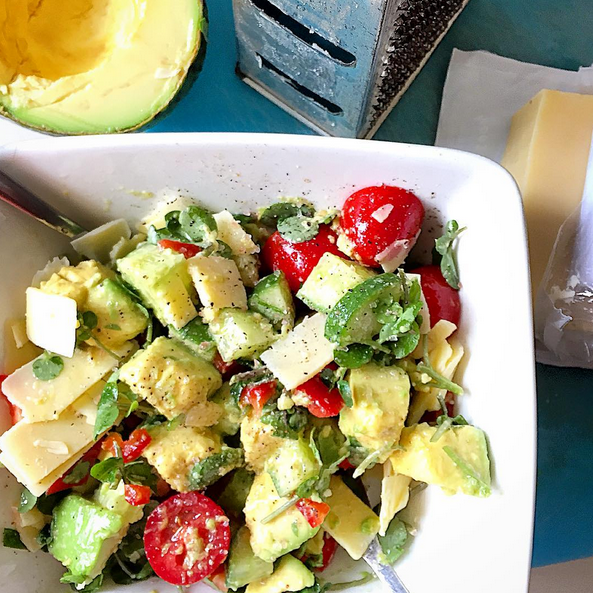
A simple salad with avocado & seeds

I’m going to give you an answer for free.

The quickest, easiest, healthiest meal you can make is:

Salad.
Just salad.

I’ve said it before, but it bears repeating: I’m lazy. On the whole, I hate complex recipes and heaps of washing up …and I’m also impulsive: if I’m hungry, I want it NOW.
But I’m passionate about eating well, as ‘cleanly’ (where ‘clean’ means as unprocessed and free of toxins, read: organic) as possible. And since veggies are the most nutrient -dense and -varied, my aim is to get as many in each day as possible …many more than the government’s “5 per day” guideline.

Food Fervour

Rushing to work? This healthy lunchbox takes no time at all

Salads make this possible when you are limited for time.  The only equipment you need to start with is:

One chopping board, a knife & your choice of serving vessel.

(I prefer bowls, so I can toss my salad more easily without scattering bits everywhere. Oh and they hold ‘fluid’ better, should I go overboard on the dressing) That’s it. Makes for a very quick and easy clean up.

Food Fervour

My favourite salad dish is a big square bowl

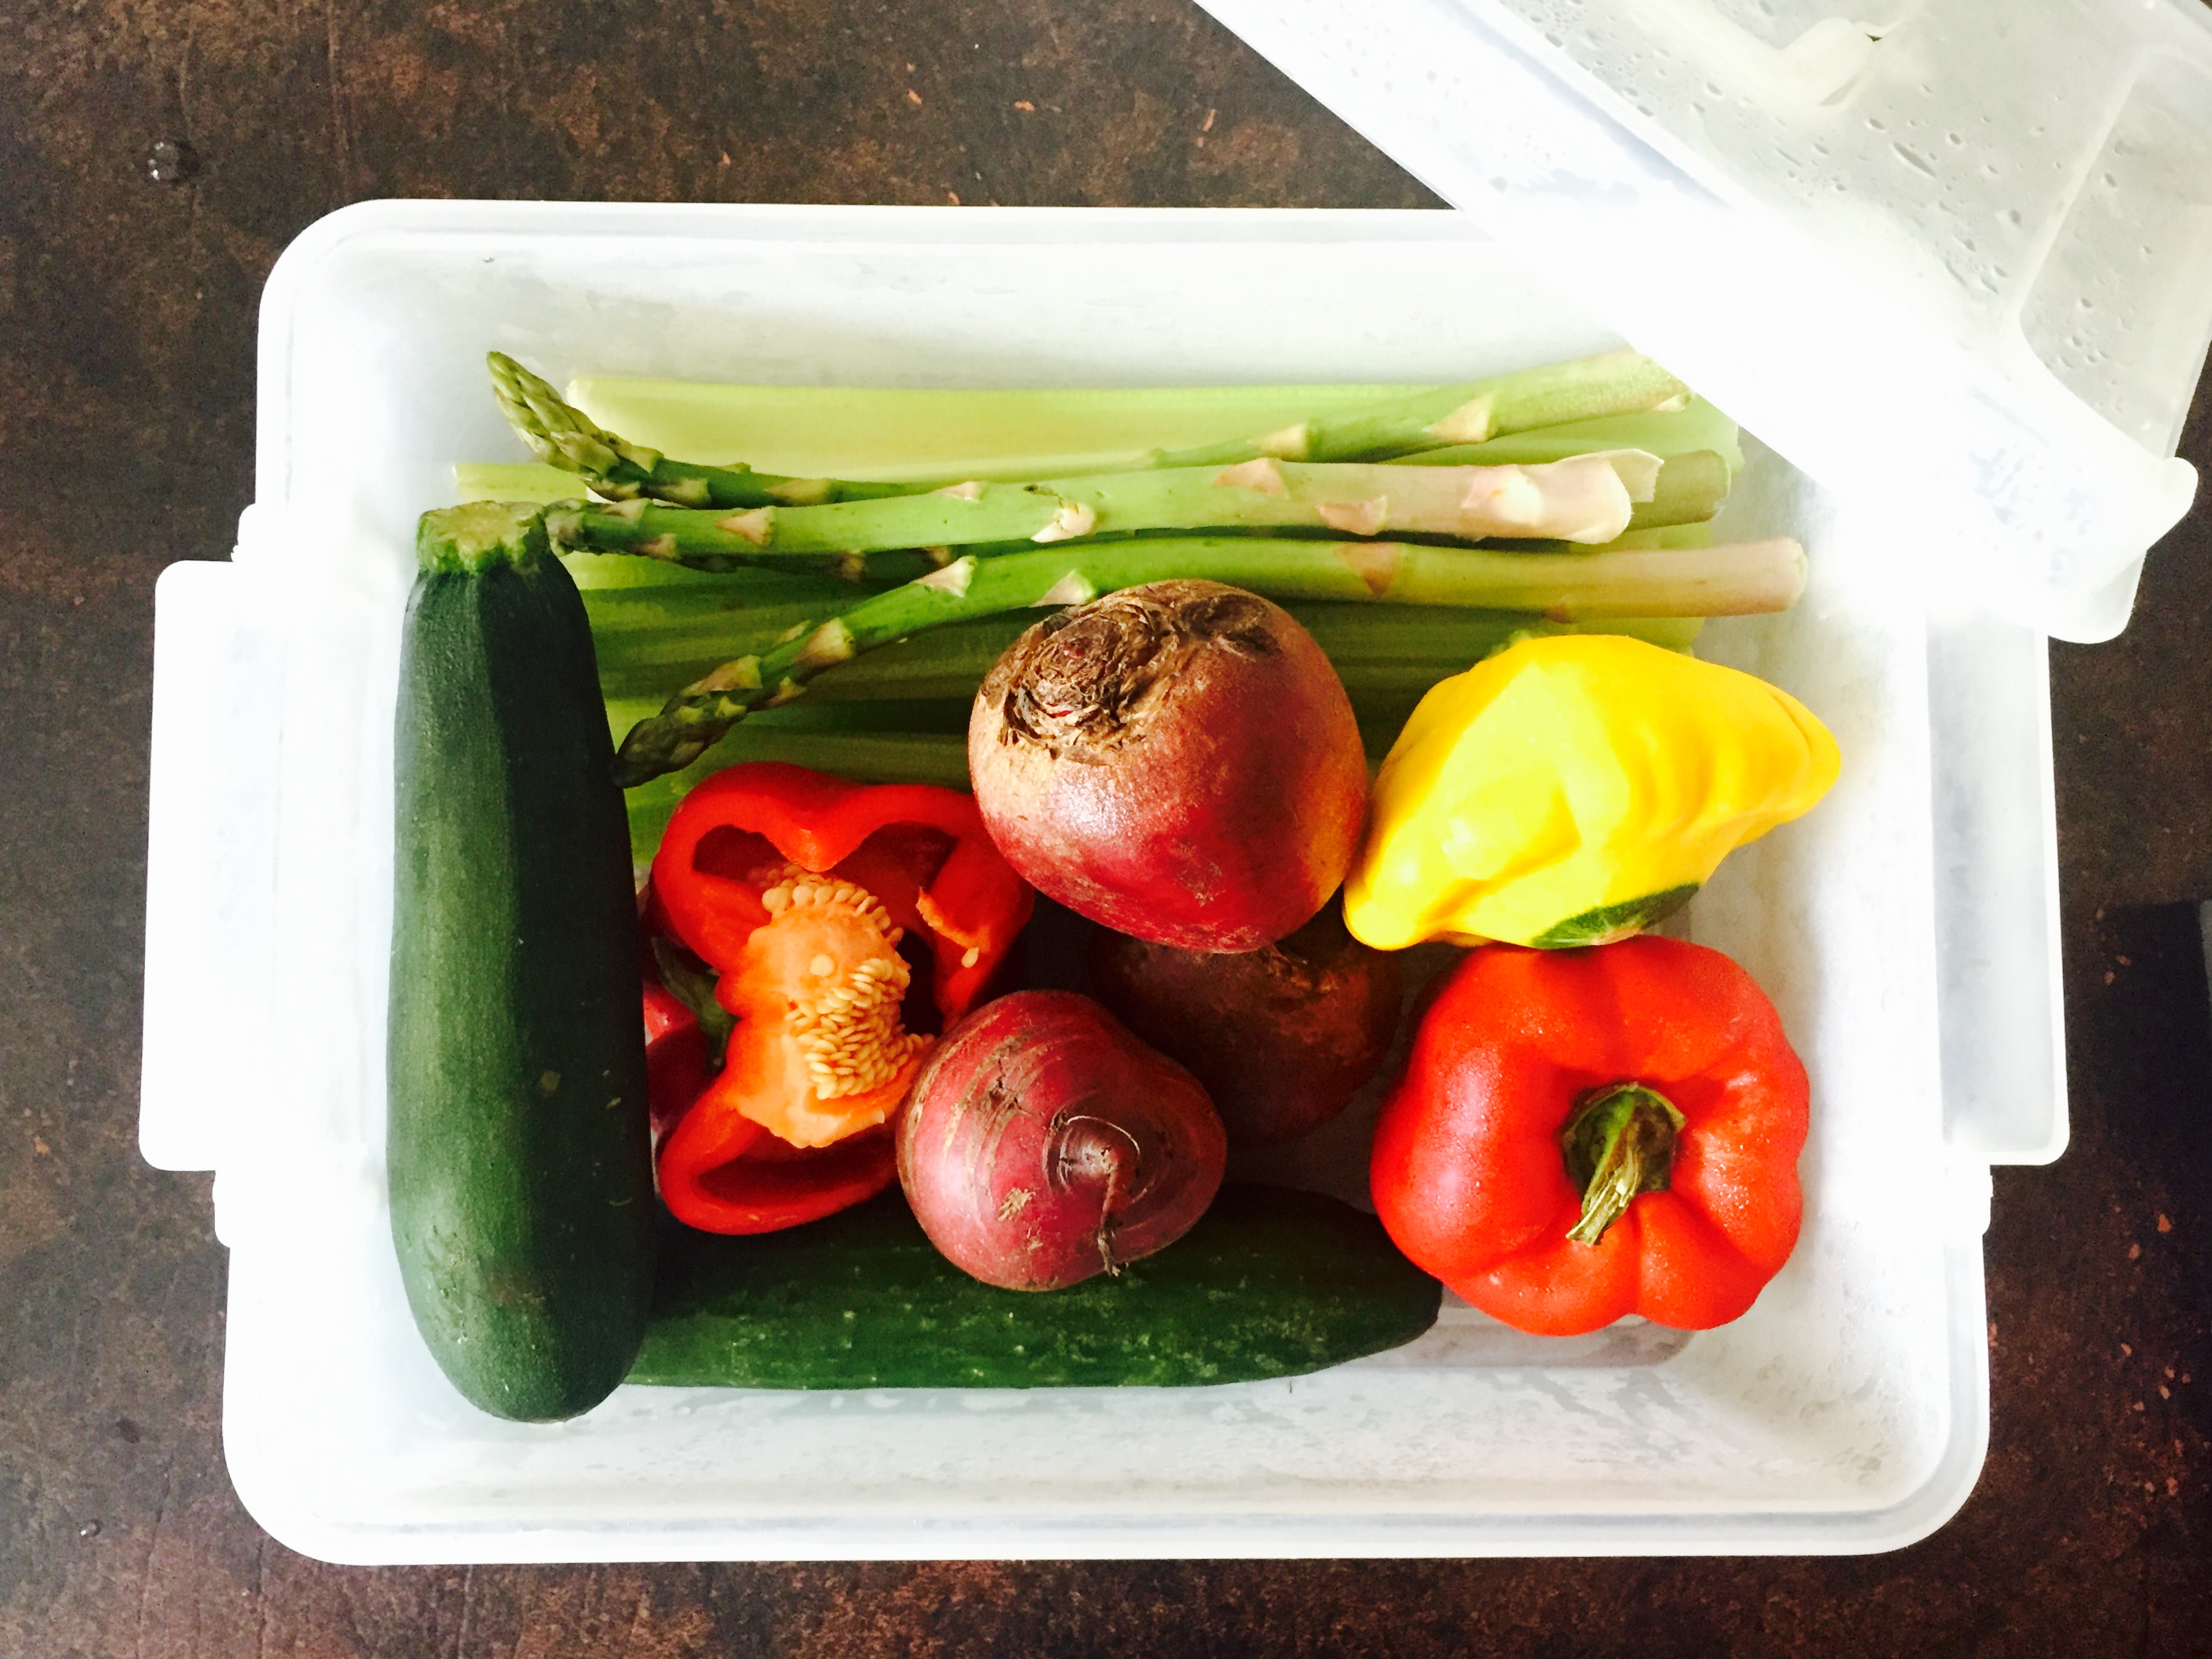
Then it’s just a matter of pulling all your foodstuffs out of the fridge. A little bit of organisation will take you a long way here: to put it simply, I try to keep everything together so I don’t have to make multiple trips. (Again, time-saving. Yes okay, as well as lazy…) The veggie crisper/drawer/bin (whatever you like to call it) is good for that. Who knows… maybe it was even designed with this in mind? 😉
Since I buy a lot of produce, it usually won’t all fit in my crisper, so I use another large plastic container in which I store the overflow (I bought it YEARS ago and it still works a treat)…

Food Fervour

Next it’s chopping time. Literally, chop: roughly or finely, however you prefer. (just no fingers, please!) I’ll usually cut finely because I like more variety in one mouthful!

I tend to put green leafy stuff underneath (spinach/lettuce/rocket) unless it’s more of a garnish (basil/watercress/mint) then load in the rest and toss it all together. Seriously, MOST foods/flavours combine well. All you have to do if you’re the slightest bit uncertain, is envisage salads you may have eaten in the past, or standard salads everybody knows. For example, I’ve turned Waldorf salad – basically celery, apply & walnuts – into a nutritional giant by throwing in green leafy stuff, cucumber, mint, eshallots, snowpeas. If you are really stuck, just Google. (Or follow me on Instagram for inspiration!) Pick an ingredient you want to use, type it in with “salad recipes” behind it and Bob’s your uncle. You will find literally tonnes of recipes on the net, and you’ll also discover that many of them are quite similar. (This is one way to become familiar with food pairings: you’ll surprised how easily you’ll absorb the info you glean…)

Food Fervour

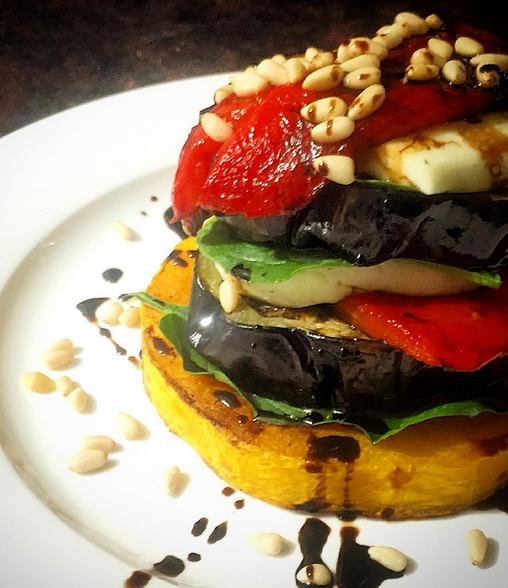
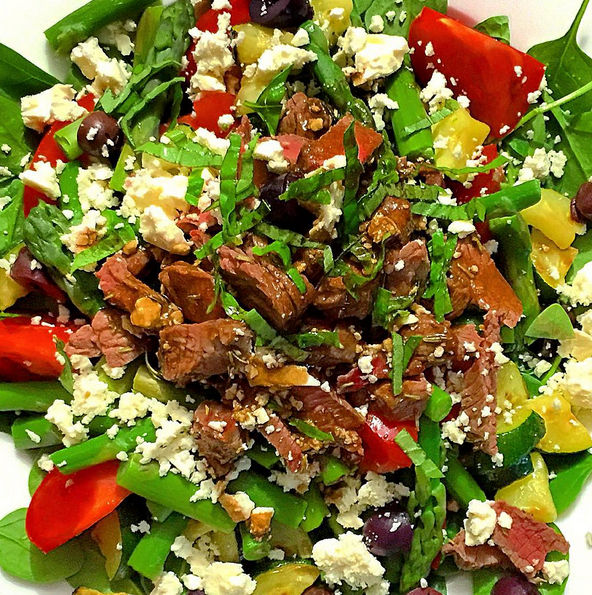
Here’s my ‘pimped up’ version of a basic Beetroot & Feta salad recipe I found on the ‘net…


Food Fervour

I’m so lazy that most of the time I don’t even blend the oil & vinegar, I just pour them directly onto the dish from the bottles.

‘Rabbit Food’ can be tedious, I’ll grant you, but it’s only due to a lack of imagination and experimentation. The dressing is often the key to salads’ flavour, and will definitely help those who (think they) detest veggies to consume them with more ease. The problem is, shop-bought (ready-made/processed) dressings house a lot of the nasties (including excessive amounts of sugar) we need to avoid. If you haven’t the time or inclination to Google dressing recipes (by the way, here’s 50 of them, I found just now on the ‘Food Network’ site…) the easiest thing to do is throw either fresh citrus juice or your choice of vinegar with some extra virgin olive oil into a small jar, screw on the cap, then shake vigorously. Instant ‘clean’ dressing. Voila!

Food Fervour

‘Leftover’ Lamb Salad

Another consideration for the ‘veggie-haters’ is protein. Since our meals should include some of this macronutrient anyway (lazy me prefers nuts, seeds, boiled eggs & cheeses) the addition of your favourite meat will make salads even more palatable. Obviously for time-saving purposes, you’d look at using leftovers from a previous meal… unless you also had time to cook something. In which case, you wouldn’t be needing to read this post in the first place…?

Food Fervour

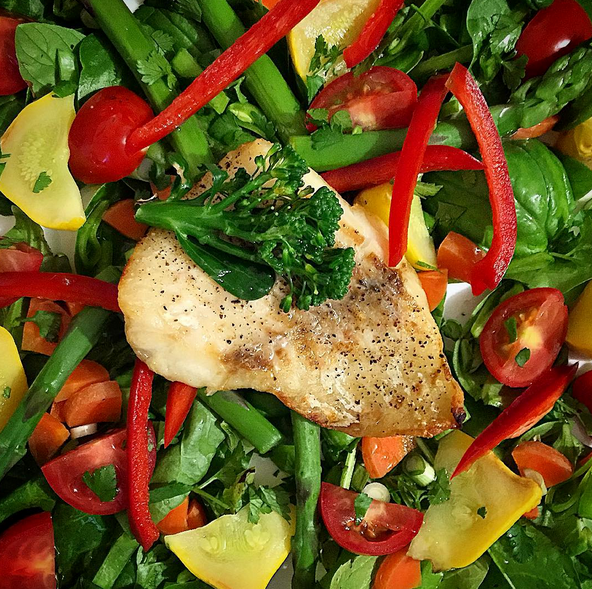
‘Sweetlip’ fish on a bed of salad

So, there’s really no excuse, as far as I can see. Eating healthily really doesn’t take much more time than it would to hop in your car and head to McDonald’s. But it’s a whole world more beneficial to your Insides. Which – quite bluntly – is the only thing that matters, because it’s where pretty much all Disease originates.

So, grab a knife and get healthy… Chop-chop!